Friday, December 28, 2012

The 2012 Year in Posts

Chapter 99
Dress Like a Grownup!'s second year is now behind us! If our first year was the Year of the Average Guy, which introduced you to the world of the well-dressed; our second is the Year of the Miniseries -- for we delved into multi-part topics that added some meat to your knowledge stew. A new reader who finds us through a websearch will be unceremoniously plopped smack in the middle of an ocean of seeming disjointed data: this easy-to-use cross-linkable summary index can be a sort of compass to navigate these waters and find his way around.

Giovanni Battista Moroni's Der Schneider (The Cutter,) 1570

We'll pick up where 2011's Year at a Glance left off.

We had a full gauntlet of men's formalwear critiques this year. The entertainment industry's offerings ran the gamut, from the decidedly casual Screen Actor's Guild and Billboard Music Awards, to the more formal Golden Globes and Emmys. My coverage of the Oscars was a dual-part affair, also covered at dandyism.net, and we even had time to take a peek at the Kentucky Derby's fashions. 2012 being an election year, we took a look at political fashion as well, from everyday campaign wear, to the black-tie White House Correspondents' Association dinner, and (also our Halloween special!) the white-tie Alfred E. Smith dinner.

We didn't neglect the Average Guy in 2012: there were several essays aimed squarely at the novice just starting out on his sartorial education. The Second Great Secret of Dressing Well was aptly illustrated, (viz., a man tends to dress back to the time when he was most happy,) using real-life examples of celebrities, and the Third Great Secret of Dressing Well (viz., A man cannot break the rules successfully, unless he knows exactly what those rules are,) was observed in the previously-mentioned Kentucky Derby installment. Spring is the ideal time to jump-start changes to your wardrobe, with at least one lightweight coat in your arsenal. We stressed the importance of wardrobe rotation and packing your seasonal items away properly. And we looked at some practical advice on how to match your clothes to the seasons, as well as a close look at the humble sock, and the popular newsboy cap as a proper alternative to a baseball cap. The Average Guy got a taste of some advanced theory with a mathematical look at stylistic balance using the continuum cube.

We completed the Island of Misfit Clothes series that we started in 2011, with re-working a suit jacket that was several sizes too large. After re-shaping the side seams, we narrowed the shoulders, tightened the sleeveheads, set the sleeves in, and put in the lining and finished off the hem. We took a look at fine-tuning the button stance, this time using shanked buttons. And we showed how to make a fine summer-time jacket by way of a quick and simple unlining operation.

There were a great many essays this year with an emphasis on history. We took a look at what Downton Abbey can teach us about dressing well, and used a decoded Mayan apocalypse to introduce a new TT&S Razor Square. The aforementioned political fashion critiques included a comparison to presidential styles of years gone by, as well.

We turned our attention to the history of men's neckwear in a multi-part series; from 1500 to 1800, then from 1800 to 1900. We overviewed men's modern tie choices, then looked at each in turn: long ties, bow ties, ascots, cravats, squares, and scarves.

Our contemplative gaze was directed to the history of tobacco use, to find if an equivalency exists between smokers and being well-dressed. After looking at the timeline from antiquity to 1820, and then from 1820 to the present, we drew our correlations, and concluded that the modern alternative to tobacco would be most useful.

We looked at economies of dressing well, both the economy of time, and the more literal economy of using your purchasing power effectively.

The tale of the Fighting Yank, that was begun last year, was completed this year in two parts: the capture of the criminals, and the raising of the Yank again.

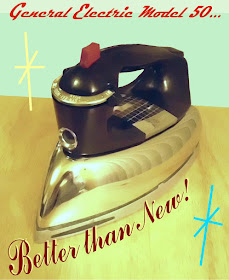
The year ended up with a mechanic's special: a multi-part series that renovated a classic iron -- an essential weapon in the well-dressed man's arsenal. We disassembled, cleaned, repaired, reassembled, and tested an old General Electric to like-new condition.

And of course, we rang out the year with the Razor Square and Bow Tie Men of the Year, our own yearly tradition.

As 2013 rolls on, we will continue to bring you sartorial goodness in one form or another...guaranteed! Stay tuned.

Click here to go to the next essay chronologically.

Click here to go back to the previous essay chronologically.

Click here to go back to the beginning.

Friday, December 21, 2012

The TT&S Razor Square Man of the Year

Chapter 98
As the end of the year and Yuletide celebrations draw ever closer, (and the Mayan Apocalypse has come and gone,) it's time for Mr Thompson's Ties & Squares to announce the yearly recipient of its 2nd Annual
2012 Razor Square Man of the Year!

The man who wins this lofty prize must meet three standards -- 1) he must have been in the public eye for the previous year, 2) he must be a consistent wearer of pocket squares, and 3) he must be a benchmark of good taste and judgement that men would do well to emulate.

The TT&S Judges have selected two men as our finalists, each of whom, co-incidentally, inhabit opposite ends of the fashion scale. So without further ado, we shall begin with the runner-up:

Steve Harvey (born January 17, 1957) was the son of a coal miner, born in Welch, West Virginia. (The tiny seat of McDowell County, five miles from Coalwood -- familiar names to anyone who has seen the movie October Sky!) He graduated from Glenville High School in Cleveland, Ohio in 1974, and was an Omega Psi Phi at Kent State and WVU. He has been a boxer, mailman, and insurance salesman, but his worldwide fame has been as a comedian.

A versatile actor with a natural stage presence, he has appeared on the big and small screens, currently hosting the Family Feud game show, and his self-named daytime talk show and morning radio programs. He is also a best-selling author, and lives in Chicago with his wife and four of his children. A philanthropist, Steve and his wife also operate the Steve and Marjorie Harvey Foundation.

Steve is well-known for being a snappy dresser, and an enduring element of his wardrobe are his marvelous variety of pocket squares. Steve is a tall, broad man, standing six-foot-two, and his Balthus-knotted ties, spread collars, broad lapels, and florid squares fit both his size and his personality. His squares are not for the faint of heart: often dual-sided or edged in a contrasting color, they are fashion-forward explosions of exuberance bursting forth from his pocket in a loose, silky pouf. Do not be fooled into thinking his squares are carelessly stuffed -- rest assured these casual artworks are carefully arranged to give exactly the right aesthetic impression.

But Steve has been edged out this year, by a man who nearly made the grade last year -- his squares are a study in exactitude and restraint, less florid than Steve's, but no less remarkable for that. Gentlemen, I present this year's winner:

Bret Baier was born August 4, 1970 in Rumson, New Jersey, and moved to Atlanta, Georgia when he was 10. He attended Marist High School, a small Catholic school in Atlanta, class of '88, and was a Sigma Chi at DePauw University in Greencastle, Indiana, where he double-majored in Political Science and English and graduated in 1992. His first job out of college was at a television station in Beaufort, South Carolina, until 1996 and then in Raleigh, North Carolina until 1998, when he was hired as Fox News' Atlanta bureau chief. After covering the attack on the Pentagon on 9/11, he was made Fox's Pentagon correspondent.
He met his wife Amy on a blind date in Washington, D.C., at a Rolling Stones Concert. They married in October 2004 and now have two sons.


He became the White House correspondent in 2007, and then began substituting for Brit Hume as anchor of Special Report. He took Hume's place as full-time anchor in 2009, and has hosted Special Report since then. Today, most people have seen (or at least heard of) Bret Baier. No wonder; his "tough-but-fair" reputation is well-deserved, and Special Report has been ranked the number one political news program on cable television.

It was this election year that put Baier's pocket squares in front of the world. He anchored Fox's coverage of the 2012 Republican primaries, and moderated five debates among the candidates, including the highest-rated cable news debate in Orlando, Florida. If anyone was paying attention to the election at all, Bret was most likely a part of it.

Bret's tight, neat reporting style, is echoed perfectly in his tight, neat pocket squares. What otherwise would be just another dreary "Reporter Black" suit is brought to life with just a hint of color and design. He is rarely seen without one, and it has not just become his own signature style, but he has influenced his co-respondents to start wearing squares as well. Each square is a small, subtle work of art.

His television folds are perfect vintage, a razor-straight three-eighths inch strip of bright white. His poufs and points are refined, sophisticated and perfectly proportioned. And his color-matching is exquisite, never exactly matching the tie, but with just enough variation in pattern or hue to give the correct visual interest. Often, the news-crawl at the bottom of the screen cuts him off at the chest, so the square isn't always readily apparent, leading to some interesting "spot-the-square" drinking games. In short, his aesthetic is perfectly in keeping with that of the Razor Square style, and this year, that gives him the edge that puts him over the top.

So congratulations, Bret Baier, you are the 
Mr Thompson's Ties & Squares 
2012 Razor Square Man of the Year!

Click here to go to the next essay chronologically.

Click here to go back to the 2011 Razor Square Man of the Year awards.

Click here to go back to the previous essay chronologically.

Click here to go back to the beginning.

Friday, December 14, 2012

The TT&S Bow Tie Man of the Year

Chapter 97
Another year is nearly behind us, and that means it's time for our own annual awards shows! This week, Mr Thompson's Ties & Squares chooses one man who deserves the accolade of the 2nd Annual
 2012 Bow Tie Man of the Year!

The criteria for our yearly accolade is threefold: 
I. Our Man must be a man in the public eye, who has the attention and influence of a great number of people.
II. He must exemplify the art of the bow tie to a high degree, and 
III. He must, through his example, encourage other men to don bow ties as well.

The selection process has been narrowed down this year to but two men, who co-incidentally, work in very similar fields.

The Runner-up chosen by TT&S this year, is an American chef, editor, publisher, and radio and television personality. His use of bow ties is very nearly a trademark, and has been an example of quietly wearing a bow tie the right way, with no fuss or fanfare, for over a decade.

Christopher Kimball (born June 5, 1951) was raised in Westchester County, New York, and went to Columbia University with a degree in Primitive Art. He went to work with his stepbrother in a publishing company and started taking cooking courses, then got his family to pony up the cash and started Cook’s Magazine in 1980, when he was 29 years old.

Now anyone who has channel-surfed on a Saturday afternoon has probably run across Chris Kimball on PBS, on America's Test Kitchen. If you've stayed your remote control long enough to sit through an entire episode of this dry-sounding show, you're probably hooked already. It's "cooking deconstructed," pared down to its delicious, infinitely repeatable, scientifically foolproof essentials, in a low-budget, minimalist, eminently practical format that is perfectly at home on PBS. This is not an accident: Kimball is the founder, editor, and publisher of Cook's Illustrated as well, which is a minimalist, eminently practical, just-the-facts magazine. Don't mistake its deliberately "downscale" format for a bargain-basement production, though -- America's Test Kitchen draws over two million viewers a week, which is about four times more than almost anything on MSNBC or CNN.

In addition to publishing and editing two magazines, and hosting two cooking shows, Kimball has authored five books, is a columnist for the New York Daily News, has been featured in everything from The New Yorker to the L.A. Times, and is a regular contributor on NPR and The Early Show. In fact, he's nearly everywhere, once you start to look for him...but much like his television programs, he's an unprepossessing fellow, more scientist than showman, and it's easy to miss him on the radar screen of cultural zeitgeist.

But for twelve years, he's been on our television screens, and he's changed very little: a Nor'easter haircut, a Don Knotts-ish expression, round wireframes. And under his red apron: an oxford shirt, sleeves rolled up to the elbow, suspenders, and a bow tie. You would think that attire that never, ever changes would become a uniform, or worse, a costume; as evidenced by fellow PBSers Justin Wilson's red string tie, Roy Underhill's braces, or Bob Ross's fuzzy, fuzzy afro. But Kimball demonstrates that one can wear a bow tie every day, for years on end, and never look out of place. He wears a variety of bows, in differing colors, patterns, and styles, and wears them all unironically and well; although his penchant for a small knot, broad leaved, medium width, lightly lined blue silk pindot clearly shows that he's been around bow ties long enough to know just what style best compliments his morphology -- and his red apron. His approach to bow ties is like his approach to everything else; precision, constancy, and efficiency of thought.

Which brings us to our winner this year. Also in the entertainment industry, also a foodie, but a relative newcomer to the onscreen bow tie. In many ways he is the counterpoint to Chris Kimball's rock-steady, week-in-week-out bows -- but the spark of life and excitement he brings to his neckwear outshines the relatively short time he has been seen in them. 

Alton Brown (born July 30, 1962) is also a television personality, chef, author, actor, and cinematographer. Born in Los Angeles, he graduated from the University of Georgia with a degree in drama. He began his career in cinematography and film production, and a decade later moved to Vermont to train at the New England Culinary Institute in Montpelier. He observed that most cooking shows were too dry and boring for his taste, and he wanted to do something about that.

He is best known as the creator and host of Good Eats, and the host of Iron Chef America. He has also hosted several mini-series and specials on the Food Network, and is the author of ten books of cookery. Although just as science-and-chemistry oriented as Christopher Kimball, his Julia-Child-meets-Mister-Wizard approach, offbeat editing and sharp wit have made him something of the Accidental Rock Star of the food world, and Good Eats has achieved the same sort of cult status among foodies that Monty Python achieved among, well, the people that watch Monty Python.

So what is it that Alton brings to the table? In a word, seasoning. (Sorry: food analogy.) His approach to bow ties is like his approach to everything else; energy, sprezzatura, and insouciance. He knows style, does Alton: and how to use that style. Alton is as notable a Man of Fashion as he is a Man of Culination. Any guy who wants to know how to not just wear a bow tie, but wear clothes and be Dressed Like A Grownup!, would do worse than to study Alton Brown. And I can't think of a higher accolade than that. 

We'll leave with some recent quotes from Alton himself on the subject:

"I like bow ties because you don't get tangled up in them. I'm a man of action." 

"The question isn't why do I wear bow ties, the question is how can you be so uncool as to not wear bow ties?"

“The bow tie also has advantages in the cockpit as it won’t snag in harnesses or headset cables. [Brown is a pilot.] Also, bow ties make me feel just a little bit more like a time lord."

So for all these reasons and so much more, Alton Crawford Brown, 
you are the Mr Thompson's Ties & Squares 

Friday, December 7, 2012

Strike While the Iron's Hot

(Part 4 of the series, "Iron Man.")
Chapter 96
We've come at last to the end of our journey, and of our Iron Restoration Project. Over the past few weeks we've found a nice vintage iron, taken it apart, discovered what makes it tick, cleaned up the business end, and fixed fifty-odd years of entropy and misuse. This week, we'll turn our attention to the Shiny Bits, and turn back the clock on the exterior as well.

Here are all the exterior components laid out to view: essentially everything save the soleplate, reservoir, and fasteners. All except the cord are subject to a good cleaning: (all we can do with that is subject the plug and boot to an automotive-grade rubber protectant.) Before we turn to the scrubbing, though, we must separate mere dirt and grime from actual physical damage that needs to be repaired.

A good example of reparable damage: a dent on the switchplate. You can see it between the Rayon and Wool settings. This is fairly common on these irons: a sign that at some point it has taken a header off the ironing board and landed on its top-front edge.

The back side of the switchplate reveals the underside of the dent clearly. Fixing it is simple: just dent it backwards. It's an old auto body repair trick: determine exactly how the dent occurred (in this case, a sharp knock along the leading edge, that rolled the deformation out into a semicircular crescent shape,) and apply reverse pressure starting from the outer edge of the roll, and work in.

A wooden chopstick and light hammer work perfectly. Place the end of the stick just where you need it, hold the piece flat against a table, and give it a light rap. Move the stick slightly, and rap again. You'll pick up a rhythm, a tap every half second or so, before long. Work the ever-decreasing crescent inward, ending at the initial knock-point, then turn the switchplate on its end and straighten out the edge. Take it easily and methodically, and the dent will gradually disappear.

Now we're ready to use some more elbow grease. Best to use a shallow tub; you don't want to lose any parts down the sink drain! Put a few inches of hot water and a goodly amount of liquid degreasing detergent, and "borrow" a bristle brush.

Take the pieces one by one and give them a thorough scrubbing until the ages of accumulated crud lift away.

Another handy tip: a wet, wadded-up piece of aluminum foil works wonders on stainless steel, (and chrome, too.)

After all is thoroughly clean and dry, lay all your parts out together. Now is the time of truth and glory -- when everything comes back together!

First, drop in the steam button, remembering to keep the same orientation by which it was removed.

Assemble the three parts of the switchplate and thermostat knob, and slide them home. Hold the steam button up from the underside with one finger at first; then the switchplate will hold the button in place.

Next, screw the handle onto the housing.

Take the reservoir, hold the steam dome in place, and start screwing the plug in by hand. Snug it with your wrench.

Put the spring ring on the fill neck, and slide the stopper rod in place.

Hold the reservoir up into the housing, and press the fill funnel into the hole in the fill neck. 

So far, so good -- but now comes the tricky part! The cam turner has to engage between the thermostat knob and the wedge cam, and it has to be done blind: you can't see what the turner's doing when you put the soleplate on. Here's the best way to improve your chances of success. Sight up through the hole in the reservoir until you can see the light shining through the slot in the thermostat lever. That gives you a target to aim for...


...when you drop the cam turner in. Notice that one end is offset and "points" to the knob. 


The next thing one would do is cut an asbestos mat the size of the reservoir, cut out all the necessary access holes, and lay it in place. Only one problem with that -- you can't get asbestos any more. It's a wonderful non-conductive insulating material that repels heat. Unfortunately, it also releases tiny airborne fibers that get stuck in your lungs and cause cancer. Thermal-insulating fiberglass mat may be the best alternative...but I don't have any on-hand. Before I go out and buy some, I'm going to assemble it sans insulation and test it that way, to see if it's really needed. 


But now back to the cam-turner. Turn the thermostat to the halfway position, so the turner is oriented fore-and-aft.


Then turn the wedge cam 90° so that its slot matches the turner.

Now, carefully lower the soleplate onto the housing. Notice that the cam turner comes in at an angle, so lower the back end of the soleplate first, line up the slot, and lower into place. Check to be sure the turner is engaged by moving the thermostat lever and putting your ear at the baseplate: if you hear the follower sliding along the cam, and the thermostat moves with a little resistance, you got it right. If not, try it again. Be patient; it may take a couple tries.

Turn the iron over, and press firmly on the front of the housing to seat the steam dome into the soleplate. Start the two attaching nuts by hand, and snug them up with your wrench. Then put the trim plate back in place.

Now attach the cord: line up the spade connectors, route the wires as they were originally, and gently snug the screws. Finally, with great ceremony, screw the hatch in place.

We're almost done! All that's left is the final testing. Get out your ironing board and something to iron, a fluffy towel, for instance. Safety first: plug into a GFCI outlet in case of a catastrophic failure...and turn your new iron on its lowest setting. If the GFCI breaker doesn't trip, (or, if you don't have one, if your house fuse doesn't blow!) and your iron gets warm, you know your circuit is sound. Congratulations...you can now plug into any convenient outlet and iron.


But before you actually start ironing, a few more quality-control tests. First, test your thermostat. Leave your iron on a warm setting for a few minutes, and make sure it stays merely warm. Now turn it up halfway, and determine that it heats up a bit and maintains that temperature. If you get runaway temperature, or it doesn't get any warmer, you may have to re-adjust your pivot screw. (And now you know where it is, and how to get to it!) 

Smoke! You may get some smoke coming out of the interior of the iron. Your first thought may be to panic, but not so fast. You've been handling the soleplate a lot, and it has been in contact with many foreign substances. It is probably just the oil from your hands burning off, and some flash-curing of the JBWeld we used. Still, keep an eye on it. Turn the thermostat down first, and see if the smoke lessens. If it does, wait for it to stop and then slowly and incrementally increase the thermostat. Fire is bad, obviously, and if the smoke starts really billowing you might have a problem that necessitates taking the iron back apart for a look inside.

Next, test out its steaming ability. Set the iron for steam, put a bit of water in the reservoir, and see if you get that slow, periodic hiss from the water dripping into the soleplate. Hold the iron off of the fabric and see that you get steam out of all the holes, then put it on the towel and make sure you get steam only out of the holes. Back pressure may force steam out of the box lid, or around the steam dome. In either case, the iron has to come apart again, in the one case, to examine the gasket seam and re-apply more JBWeld: you've missed a little, most likely hiding 'way underneath the wedge cam. In the other case, you need to make a little round gasket to fit underneath the steam dome. You may be tempted to live with it, but in the long run, taking it apart again and making sure you have chased down all the steam leaks will be the better path.

And finally, a check on the "conducted heat" factor. Yes, without the asbestos, the handle gets warm. The trim plate under the handle gets very warm. But for daily use, it's certainly tolerable. I wouldn't want to take on a marathon ironing session of every item in my wardrobe, without getting a bit of fiberglass insulation first. And I will, eventually. 

I hope this little project has opened your eyes a bit to the benefits of "going vintage." It's true; things WERE made better in years gone by. This elegant, chrome, improbably aerodynamic appliance is sturdier, heavier, and more robust than anything you can buy today, for a fraction of the price. It is, literally, "better than new." And it will still be working, long after a brand-new iron is in a landfill. Now I'm going to gift-wrap this baby, and put it under the Christmas tree.

Click here to go to the next essay chronologically.

Click here to go back to the previous essay chronologically, Part Three of Iron Man.

Click here to go back to Part One of Iron Man.

Click here to go back to the beginning.

Friday, November 30, 2012

Irons in the Fire

(Part 3 of the series, "Iron Man.")
Chapter 95
In this, the third part of what shall surely be known as the Great Iron Rebuild of 2012, we'll turn our attention to the refurbishment of the soleplate, complete the disassembly, and prepare for the final cleaning and reassembly next week of our venerable General Electric F50, which will then be ready for another half century of dependable service. 

As with any restoration project, (as anyone who has ever owned a classic car will tell you,) the only limit to perfection is how much time and money you want to spend. You can build a hundred-point concours d'elegance winner, or a just a driver to cruise around town. As we saw last week, the soleplate has some, well, issues: viz., the hex-head mounting screws are rusted in place, and the steam lid is warped. We've gone as far as electrolysis can take us. If I were truly inclined to make this perfect, there are tricks to use to get those screws out. I could soak the screws in penetrating oil for days, freeze the soleplate, then expand the metal around the screws with a butane minitorch. If all else failed, I could just drill out the screws and tap new threads. 

Regardless, the "pretty" way is to remove all the bits, take all the steel down to shiny metal, flatten the steam lid, polish all the aluminum to a smooth gloss, machine the mating surfaces, make a new gasket, and put in new stainless machine screws. It would look better than new and last for a hundred years...but you'd never know it was there. 

Well, we're not going to do that. We're making a runner. It'll look good on the outside, but everything "under the hood" will just be made to work, aesthetics be damned.

First, we'll patch the blown-out steam box gasket. For this, we will use the best metal bonding material known to man: JBWeld. If you're not familiar with it, it's a two-part high-temperature, high-stress epoxy. Before it cures, it's like thin putty. When it's dry, you can machine it like metal. The Kwik-Weld version here has a six minute working time, and cures in six hours. Get a wooden skewer, and something to mix on (I'm using tinfoil).

Dispense a small and equal amount from both tubes, and mix them together. The clock is now ticking...you only have a couple of minutes to work with it.

Using the pointy end of the skewer, pick up a bit of the putty, and roll it in along the gasket line with a pull-and-twist motion to the skewer. You'll probably get three or four inches along before the putty starts to cure. Just smooth it down in the crack and make up another small batch.

Don't forget the bit down inside, under the mounting plate. With a steady hand you can get the skewer in and roll the putty just where you want it.

The lid sealed, using just enough material to close and seal the gaps. After it cures, you can sand off the excess along the sides for a neater finish...but functionally, the steam box will now work like new and direct all the steam down...instead of up, out, in, and every direction except down.

Now let's turn our attention to that sole. Ugly you will agree.

Here's where the elbow grease comes in. If you don't have an orbital sander of some sort, a sanding block will do the job -- eventually. Start coarse, say, 60 grit or so, and using longitudinal strokes, start shaving away. The sole is warped somewhat, and sanding against a flat block will get everything on the level -- again, eventually. (This is a slow and messy process. Black aluminum dust will get everywhere, so be warned.)

You can go as far as you want to with this. You can just take off the scorch and discoloration if you want. You can take it to the next stage and rub out the major scratches and knock down the high points. Or, you can spend a week, get it dead-level, and progress through finer grit paper until you are wet-sanding with 2000 grit and the sole is mirror-smooth. It's up to you. This pic is the tail-end of the knock-down stage. Minor scratches don't worry me, so I won't go much further than this point.

With the soleplate sorted out, let's turn our attention again to the top end of the iron. The only visible fastener is a hex fitting under the steam dome, so let's take that off.

The hex fitting, it turns out, is a plug with a small hole in it. The hole is stoppered with a needle up inside the reservoir. Releasing the steam button on top of the iron retracts the needle, permitting the water to drip slowly through the plug onto the soleplate, where it flashes into steam. The fitting also holds on the steam dome. The dome presses tightly down onto the hole in the steam box lid, preventing steam leakage.

There's no apparent visible way to remove the reservoir...but push lightly against the reservoir with one hand against what feels like spring pressure, and with the other hand, rock the fill funnel back and forth...

...until it works free. The fill funnel is the only thing holding the reservoir in place.

The reservoir pulls straight down out of the housing.
Now we see the source of that spring resistance: a spring ring at the bottom of the fill neck. It pulls right off. That spring insures that the steam dome presses firmly down against the soleplate once the housing is bolted in place.

Pull the spring-loaded needle straight out of the fill neck.

Keep the needle safe, don't let it get damaged! It looks a bit like a gravity-feed carbureutor's needle and jet, but a more accurate parallel would be the stopper in a bathtub. It doesn't have to be a perfect fit to work.

With the reservoir out and stripped, test it for leaks. Fill it up and see if there's any seepage. If there is, and you're handy with a soldering iron, that's the "proper" way...or you can break out the JBWeld again and plug any pinholes.

Turning to the underside of the housing, the handle is held on by three hex-head screws. Remove those...

And the handle lifts right off.

Then, we can remove the controls. The thermostat lever is held on by a friction fit. Put your thumbs on either side of the handle like this, press down and slide forward...

...and the thermostat assembly slides right out of the handle.

The assembly is stacked as shown: lever on the bottom, setting display on top, with a spring plate sandwiched between. The spring plate holds the display in place, and gives some drag resistance to the lever.

And finally, the Big Red Button.With everything else out of the way, the button simply drops out of the handle.

And that's where we'll leave off this week: with the top half in bits, and the bottom half ready to go. Next week, we'll clean and detail the showy part, button everything back up, and take our new car --er, iron-- for a test drive!