(Part 11 of the series "The Island of Misfit Clothes")
Chapter 53
Today, we reach a tipping-point on our reconfiguring tour through our outsized three-piece suit! All those weeks of measuring, marking, ripping, cutting, and marking again are finally coming to a middle. It can get disheartening to take on a big project like this, when things go to pieces and stay there...it seems like you've bitten off too much, or the eventual payoff can't possibly be worth all this work. Well, this week you'll see some light at the end of the tunnel: for our side seams are coming together for good, and our jacket is on the short side of completion.

When we left our jacket, it was sitting on the tailor's form, with the side seams basted in place. Let's take a look at the hem of the jacket before we start. You'll notice that the back is shorter than the sides; that's a side effect of shifting the balance away from the fronts. Notice that the right side is longer than the left, as well: a side-effect of correcting for my slightly low right shoulder. We'll fix that as we go. It's easier to do the final stitching with the jacket in your hands, so off the form it goes.

Lay it out on an ironing board, and warm up your iron as you did last time. We want to equalize the hem length all the way around, and start the finished seams at the very end of the hem; so unfold the turn-under at the back. The green arrows show the disparity of length between the two sides.

Unfold the turn-unders at the sides as well, as far as you can.

Take your razor knife and release any pick-stitches that may be holding the turn-under in place. (No need to go all the way to the front.)

There we go. Much better. There's plenty of fabric now to use for the new turn-unders. (This jacket has black linen sewn into the edges, to help hold the turn-unders up...yours may or may not have them, they're not standard equipment.) Unfold both sides, and steam out the creases, using the technique we practiced last time.

Here's the back edge, all laid out and ironed flat. The red line shows where our finished hem will eventually be.

Now, lay out the jacket like this, with the basted seam front-and-center, with the hem edge closest to you. Get out needle and thread in a color that matches the fabric -- pull out a length about a fifth longer than the seam length itself -- and prepare to do some sewin'. If you can manage working in your lap, cross-legged in true tailor's style, bravo for you! It's also quite acceptable to do this work sitting in a comfy chair, or (if you must) working at a table. Relax your shoulders and don't tense up. Don't work up close to your eyes too much after you get a feel of what you're doing, either. Tailoring isn't fun with knotted shoulders, cramped fingers, and a splitting headache.
There's a pleasant zen component to needling done well. With practice, you will be able to sew as much by feel as by sight. Take it easy, don't try to force your way through it, and if you need to take a break, do. Remember there are people who have done this ten hours a day for sixty years; so if your hand feels like it's going to fall off after ten minutes, step back and think through what you're doing wrong with your technique. Relax your arms, keep your back straight, and breathe.

We'll use a running backstitch for the seams. It's easy to do, fairly quick, and is done from the frontside of the fabric so you can see your progress. The first thing, though, is to anchor the end of the seam with a small tack stitch: just three tiny horizontal stitches that just catch each side of the seam, like this, and pull it snug.

There; that's tight. Now; onto the stitch.

Here's how it's done. [top graphic:] Run the needle up the middle of the seam, taking a small bite out of one side, then a small bite out of the other. Load the stitches up the needle, so the fabric pulls in a zigzag on either side. Use the finger and thumb of your left hand to pinch the seam together, and your right hand to work the needle in. With a little practice you can do this totally by feel. Take stitches as small as you can; aim for 6 or 8 stitches piled on the needle. [center graphic:] When the needle's full, push it through, and bring the needle back in just behind the last stitch. [bottom graphic:] Pull the stitches snug, then load the needle again. The single backstitch will hold the eight running stitches in place. There's no need to crank the stitches tight; just enough to hold the fabric firmly together. A good stitch will be a little elastic, and besides, if something rips in the future, you want it to be the seam that gives way and not the fabric.

Here's how it looks in action. Notice the position of my left hand. I'm pushing the end of the needle through with my right thumb, you can see the tip of the needle coming through further up, with the zigzag of the fabric on the needle...

...Here's the needle going in for the backstitch...

...and the first run of stitches after the backstitch-and-snug motion.

(Take out the pink thread ahead of you as you go; it'll save you some trouble later.)

Now we're about a third of the way up. Notice the three pink threads ahead of the stitch: remember there are marking stitches for both sides and the basting stitch to remove!

At the top of the seam already! It does go quickly once you get the rhythm. Notice the way I gather the fabric in my left hand as I work my way up the seam.

The seam completed. You will see some puckers and gathers along the way. "Oh no!" you may think -- don't worry, they'll press out.

Arrange the seam straight down your ironing board, like this, and smooth it taut as best you can. Then steam it flat. Don't iron the whole side -- just the seam. There's existing shaping over the hips and shoulders that you don't want to derange with the iron.

The seam as it should look after pressing.
...
Now, all that remains is to do the exact same thing, for the other side.

Now we're seeing some real progress! Put your jacket on; dance around the house in it, admire yourself in it in the mirror. Go ahead, you've deserved it. Can you believe this was a size 46? It feels like it was made just for you.
Because it is, now.

When you're finished admiring your handiwork, replace your jacket on the tailor's form...we're not quite done this week! Now that the body's complete (and doesn't it feel good to say that) let's turn our attention to the shoulders.

Your jacket may or may not have the top part of the seam turned under like this one, so that the sleevehead sits even with the shoulder and doesn't stand proud. Some jackets have pronounced "roping" in the sleeveheads to give the opposite effect; it's just a matter of fashion. Notice where the ends of the turn-in are located if you have them... you'll need that later.

We have the new position of the shoulder already marked; now we just trim the excess off, leaving about ½". Only trim the shell fabric; not the canvas or cotton.

Here's the armscye after trimming.
Now make small snips where the ends of the turn-in were...

...fold the turn-in right at the marked line...

...and steam it in place with an iron, right on the form.

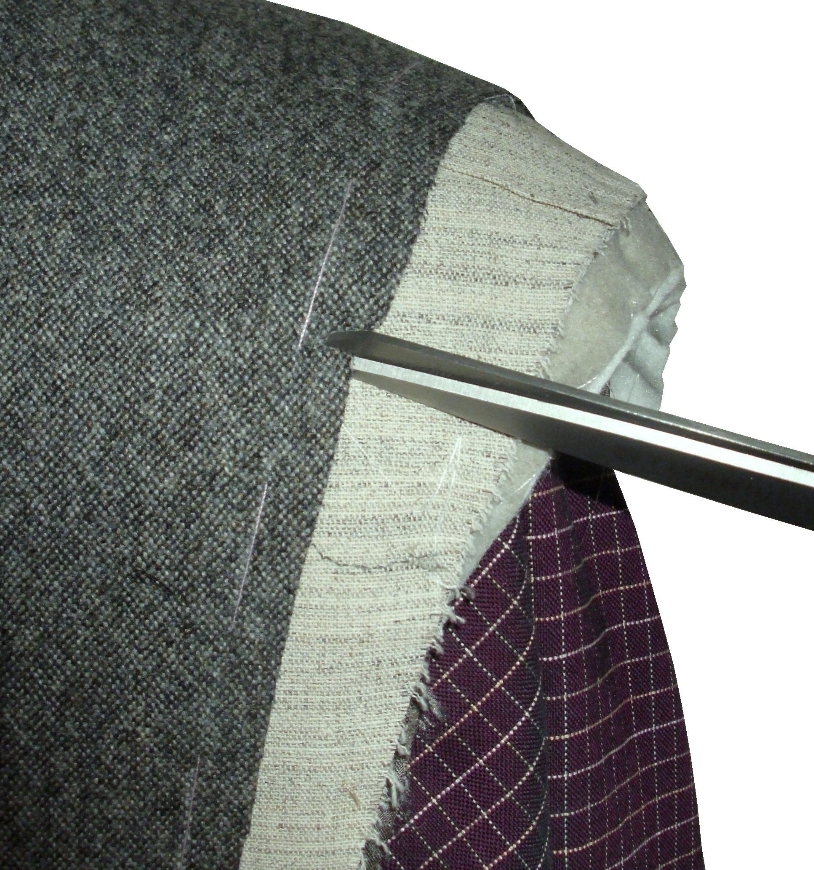
Now we can cut back the canvas layers to match the new shoulder point. Snip with scissors, along this line.

Then snip the cotton batting layers, along this line.

This causes another problem to deal with. The cotton you've just cut was gradually feathered and tapered out to the edge, and what you have now is a wall of cotton wadding, as you can see here. If there is a protective layer of interfacing on top of the cotton, fold it back...

...and snip the cotton at a shallow angle to shave it back to a tapered shape. Work as far under as your stitchmarked armscye line, and feather the padding down to nearly nothing at the edge.

Here's your finished shoulder line, trimmed and padded and ready to be re-introduced to your sleeves.
And that's where we'll pick up next time: setting the sleeve pitch and re-attaching the sleeves. Stay tuned!
Click here to go to the next essay chronologically, Part Twelve of The Island of Misfit Clothes.
Click here to go back to Part Ten of The Island of Misfit Clothes.
Click here to go back to the previous essay chronologically.
Click here to go back to Part One of The Island of Misfit Clothes.
Click here to go back to the beginning.
Click here to go back to Part Ten of The Island of Misfit Clothes.
Click here to go back to the previous essay chronologically.
Click here to go back to Part One of The Island of Misfit Clothes.
Click here to go back to the beginning.
No comments:
Post a Comment