Showing posts with label Advanced. Show all posts

Friday, July 4, 2014

The Calculus of Dressing

Appendix 2.

Back in the installment Chapter 70, called “Keeping Your Balance,” we looked at the concept of weighing specific style variations, each against each other, to achieve a harmonious whole within a single outfit. To help visualize this, I devised a graphic representation of the continuum of balance as a three-dimensional cube, each of the axes standing for one range of opposites—the Continuum Cube.

That was all well and good for an overview, but it was the stripped down, basic version – there’s actually more to the theory than what I posted there! I gave a more complete view in my published works, but here in the Appendices I am going to share with you the fully-realized, advanced theory.

The complete theory of balance is visualized scientifically here by use of a four-dimensional theoretical construct of the Continuum Cube—a Grand Unified Theory of dressing well, if you will, that graphs every possible option of menswear for every possible circumstance.

There have been numerous philosophical postulations over the years concerning the art of dressing well. To those we can now add a mathematical theorem, a graphic distillation of the musings of D’Aurevilly, Wilde, Bulwer-Lytton and de Balzac, which clarifies and concretizes their ideas in a clear way: that dressing well is an ethos, an attitude and outlook on the world that just happens to be reflected in its external appearance. The most obvious aspect of your appearance is your refinement of the art of dressing well: to be correctly and impeccably attired in any given situation. As Brummel said, “If John Bull turns to look after you, you are not well-dressed, but either too stiff, too tight, or too fashionable.”

Let’s start with the idea of formality. You have an innate sense of the degree of formality of any outfit you might be called upon to wear. You wear nicer clothes to church than you do to work, and nicer clothes to a wedding than you do to church; and if you were playing golf, you would be dressed better than if you were playing tennis. If you were to graph all the different sorts of clothes you wear, you could represent them as a line, with the dressiest at one end, and the most casual at the other. We'll call the two extremes “formal” and “sporty.” What we would have is a bit of geometry: a line. It would look like this:


Notice that from any point on the line, you could choose something more formal, or sportier (you could also call it “casual” or “informal.”) Our line extends forever in both directions, as lines do, but that won't do for us; for you can't go on increasing formality forever.


The solution is to make the line asymptotic and the end-points as a limit, which can be approached infinitely closely, but you actually can’t truly “get there.” Reaching the limit is relativistic—the closer you get, the further you have to go, and the harder it is to get there. One limit is the point beyond which you can't get any more formal. That point represents the dress suit: for white tie and tails is the most formal thing a man can wear in the Western world. In other cultures it may take a different form, but the result is the same.


Logically, at the other end is an asymptotic limit beyond which one can't get more casual – which, it stands to reason, is being entirely naked. (Why is this, you may ask? Patience…we'll discover why soon.)


So our line segment, our X axis, if you will, looks like this:


Every element and article you wear fits somewhere along this line. The goal is an average between two extremes that is not too far out of the range of “normal” for your particular place and circumstance; whether this is attending a wedding or shopping for groceries. In other words, for any point on the line, any deviation on one side of the point must be weighed carefully against its variation on the opposite side of the point, to achieve a harmonious whole. The problem in today's world arises when a man doesn't know what to wear at all, much less how to find what an average value is, and even less how to work the extremes to maintain that balance properly.

As an example: everyone has at some point been subjected to such aberrations as a tuxedo jacket that has been paired with sneakers, or a patterned shirt, or a loosely-knotted long tie, or a silly hat, or sloppy jeans. Their misguided thinking is that a dinner jackets' formality will be offset by the other things, and the average will be dressy-casual.

This doesn't work in practice, because the attempt to balance two variations is increasingly unlikely to create a harmonious average the farther apart those extremes are. In fact, dinner dress is so extremely proscribed, it takes very little to push its balance to a place of informality: all that is needed are minor alterations to detail, like a subtly-colored boutonniere, a flash of pocket square, a rakishly-designed waistcoat, or even the material of the jacket itself.

It seems pretty easy so far, doesn't it? Well, we have another line, which describes another dimension of being properly dressed: the difference between “town” and “country” wear. Whilst the “Formal/Sporty” line describes the differences in the purpose and cut of your clothes, the “Town/Country” line is concerned with your clothes' color and pattern: for mens' clothes should properly match the environment in which they are worn. A “town suit,” for instance, is plainly cut and conservatively tailored, with smooth fabrics and dark colors, usually in shades of black or blue: the colors of steel and iron and concrete, the textures of glass and chrome and macadam.


A “country suit” tends toward the rough tweeds, pebbly or textured fabrics, in browns or greens, in plaids, checks, or other patterns, with details like collar tabs, elbow patches, or flapped pockets: the colors and textures of nature, with details that reflect outdoor pursuits.


This line, too, has two asymptotic limits, and those limits are of necessity the same as with the formality continuum: the most “Town” you can get is a dress suit of white tie and tails, and the most “Country” is not dressed at all. The two scales that we have seen operate independently of each other: for every point of formality, there can be applied the complete range of values in possible color and pattern. We can graph these against each other on an X and Y axis.


Most men have a passing experience in the art of color and pattern matching. At its most basic, it is an intuitive reflex. A dark suit needs a light shirt and a bright tie, for instance; or else the suit looks muddy and somber. A light suit looks better with a patterned shirt of a darker color, and so on. Making informed decisions regarding pattern takes more experience, but is also largely intuitive. Matching a plaid shirt with a plaid tie may look busy if they are in the same color range and size, especially if paired with a plain suit; but a suit with a subtle pattern paired with a very light plaid shirt and a very strong plaid tie may look very handsome indeed. It's all in the balance created between the factors.

If we were to graph every possible combination of these two groups of extremes, we would discover the result is the limit of a square, each point of which describes one individual shade of purpose and cut, color and pattern.


Dressing well now becomes a matter of determining your purpose and location at any given time, charting that point on the graph, and making your clothing suitable to that point on the X-Y axis. The closer the average effect of your clothing is to that point, the more “correctly” you will be seen to be dressed. On this square, the front right-hand corner, representing maximum values of Town-Formal, would represent the dress suit; and the rear left corner, representing maximum values of Country-Sporty, would be nudity. (This latter corner, naturally, is to be avoided if you desire to be a well-dressed fellow.) The relationship of all four factors taken together is the balance of your outfit.

Where the axes cross, (we'll call it point 0,0) is a theoretical neutral outfit that is all-purpose, neither too dressy nor too sporty, that would not look too out of place either in the city or out camping. This theoretical middle-of-the-road outfit would not be a panacea that would be instantly accepted anywhere, mind you! It would, rather, be bland porridge, neither one thing nor another, and you would likely be seen everywhere as not quite fitting in, no matter where you were or what you were doing. The neutral point at the center of the graph is not a target at which to aim – it is a sinkhole to be avoided!

Before we continue, let's look at some examples of how to use the scale as we have constructed it thus far.

You can adjust the balance to your immediate purpose, by changing a single detail to adjust the point along both axes. A matching three-piece looks official and professional for a business meeting, and would occupy a place well in the Town scale, and moderately in the Formal scale. Simply change out the matching waistcoat for a tattersall version, and the outfit looks less stuffy for an evening out, by skewing the point both towards the Sporty and Country.

You can also make an adjustment to either scale independently. Running to the auto-parts store to buy an oil filter and spark plugs in a suit and tie may raise some eyebrows, but you can keep the same point along the Formal continuum and slide the Town continuum strongly into the Country realm with a hardy tweed jacket, open-collar shirt and dungarees: the message is that grungy business is at hand. A seersucker suit, loafers, and a bow tie looks fine on the boardwalk, firmly in the Sporty-Country quadrant, but you wouldn't wear it to church without skewing it into the Country-Formal quadrant.

These basic style decisions can be complicated with variable factors such as the time of year and the immediate weather conditions. For instance, on a bright day, a pair of tan trousers may look fine with a mid-gray plain weave jacket; but on an overcast day, it would appear too Country, and a darker gray herringbone jacket to skew it slightly towards the Town side may look better. In the heat of summer, a shirt and tie may look overdressed in lieu of a simple polo shirt under your jacket; but in the fall, going without a tie may result in an underdressed appearance.

Now that you've gotten familiar with the two-axis system of clothing balance, we'll add a third measure to the continuum. Just like the other two, this third balance factor operates independently, and can be applied to every point in the square. This scale will be applied to your clothes' style and detail.


At one end, we have the historical extreme – the traditional, conservative, classic styles. At the other end, the contemporary extreme – the avant-garde, imaginative, futuristic, and innovative styles. We'll place this continuum at right angles to the other two, along the Z-axis: and call the extremes “Historical” and “Innovative.” Simply, the further along the “Innovative” direction you go, the further away you get from tried-and-true style trends.


When we graph every possibility of style against our other two measures, all the major factors of sartorial balance are accounted for and can be reduced to three continua. These continua can be visualized and plotted against each other as axes on a three-dimensional graph.


This is the Continuum Cube. Any point within this cube is defined by our three balance factors. The continuum is the limit of a cube; it is not unbounded on all sides. The ideal, as it was with the two-axis plane, is not the intersection of the axes at the exact center of the cube. Near the external faces of the cube are the limits of perspicacity, where clothes become costume. And just as you've seen with each individual scale, and also with the X-Y axis, the X-Y-Z axis has the same oppositional value, viz., the “Fully Dressed Point” at maximum Town-Formal-Historical is counterbalanced by its logical opposite at maximum Sporty-Country-Innovative – the “Fully Undressed Point.”

Let's use the Continuum Cube now to briefly demonstrate how skewing works along all three axes. We'll start at an easy point to visualize: the top right corner of the cube that pegs all three scales for formal, town, historical wear. Of course, it's the dress suit again: bespoke tailcoat and trousers, boiled-front shirt, pique Marcella waistcoat, stiff detachable wing collar, white tie, and patent leather pumps, with all the accompanying studs, links, straps, braces, and buttons that go with it. You can't get more Formal-Town-Historical than that. It's a very exacting and unforgiving point on the cube, right at the end of the limits, and must be followed precisely, because right on the apex of the cube is where it belongs.

Because of its precarious position, the dress suit is easily knocked off its apex by the addition or alteration of any detail. A simple boutonniere will skew the outfit slightly down the X axis, ever so slightly away from Formal. Substitute balmorals for pumps, and the skew jumps further down the Sporty scale, as well as the Country, and even slightly Innovative, and just like that – you're off the face of the cube and into the interior. This lone example also demonstrates why proper white tie is as exacting as it is.

Why is nudity the “Fully Undressed Point,” and not, say, swimming trunks, or even underwear? Because even swim trunks are subject to variations in sportiness, color, texture, and historicity, all of which will place it somewhere within the boundaries of the Cube, even if it is just adjacent to the apex. There just isn't a garment that is the opposite of a dress suit: as the limits of the axes are reached, the options of the furthermost point dwindle down, until the point of the apex is...nothing.

The apex and surface points are for our purposes theoretical: since a limit by definition can never be reached, you won't be dealing with the extremes on the faces of the cube. You will be dealing with any number of factors that will average into a value somewhere in the middle interior of the continuum.

Now, the three-dimensional Continuum Cube only works as far as the physical aspect of your clothes – but as we’ve found, how you wear your clothes, your degree of insouciance and panache, has an effect on where they skew on the Cube as well. This is of particular interest, as a properly insouciant attitude is integral to being perceived as well-dressed. So we must bring another axis in play – a W axis, at right angles to the other three, to make a hypercube.

What’s that you say? You’ve no idea how that works? Well, let’s work through the progression mentally. Take a point, and put another point at right angles to it. (Since a point has no dimension, technically “right angles” is any direction at all, but we’ll call it “right angles” for the sake of consistency of the illustration.) These two points form a one-dimensional figure: a line segment. It runs in one direction—length. Now take a line segment, and put four of them at right angles to each other such that they define an area. You have made a two-dimensional square: it runs in two directions—length and width. Now take six squares, and put them at right angles to each other so that they define an area. You have a cube now: three dimensions, three directions—length, width, and depth. Of course, here on your computer screen it’s merely a shadow of a three-dimensional form, but your brain recognizes it as a cube, even though all the sides aren’t the same length and the angles aren’t ninety degrees.


So far so good, but now it gets tricky. Continue the pattern: two points, four lines, six squares – now what? Of course, eight cubes; at right angles to each other such that they define an area of four dimensions. The problem comes when we try to imagine the W-axis, at right angles to the X, Y, and Z axes. What’s after height, width, and depth? The best we can see is a three-dimensional shadow, reduced again to two dimensions on your screen – a mere shadow of a shadow.


Because it is so devilishly hard to imagine a four-dimensional hypercube, and even more difficult to represent it on a two-dimensional computer screen, I won't even attempt to include it graphically. That fourth dimension represents the manner of the method and attitude of wearing your clothing and the degree of precision of its physical execution. At one limit, we have nonchalant, detached, easygoing, and breezy. At the other extreme, calculated, purposeful, precise, and severe. 


Graphed against the other 3 axes, the limit of Nonchalance coincides with the “Fully Dressed Limit” of Town-Formal-Historical, and the limit of Precision coincides with the “Fully Undressed Limit” of Sporty-Country-Innovative; thus, the closer to fully dressed one is, the more nonchalance is required. Contrariwise, the more casual your clothing, the more precision is required to offset the ever-present danger of slovenliness.

This presents a useful method of representing the fourth dimension of the Continuum Cube in relation to the other three directions. We know the limits of Nonchalance/Precision coincide with the limits of the other three continua, and we know each three-dimensional point is subject to the complete four-dimensional variance. (If this is befuddling, just reduce the exercise by one dimension: every single point on the two-dimensional graph of Formal/Sporty and Town/Country is subject to the entire scope of the Historical/Innovative variation.)

If the four extreme limits located at opposite apices of our hypercube (the F/T/H/N and the S/C/I/P limits) are then connected by a line, it will also pass through the midpoint of the W, X, Y, and Z axes, (at 0,0,0,0,) and a new axis is created: what I shall call the DANDY AXIS. (Dandy in its historical sense: as representing the apex of the art of dressing well from a holistic mind/body standpoint.)


Quite simply, for any circumstance, the most elegant mode of dress will exist at some particular point along the Dandy Axis, wherein all four continuua shift together in an equalinear progression. All four factors will then be in harmony, no one variation will stand out among the others, and for any given situation there exists a correlating given point on the Dandy Axis wherein you will assuredly be properly dressed, and John Bull will be given no reason to turn his head to look after you.

The relationship of the Dandy Axis to the four directional axes W, X, Y, and Z can be easily illustrated by separating the four dimensions out and placing them alongside each other, as scales on a slide rule. The Dandy Axis is represented by the movable cursor, which intersects all four axes perpendicularly along congruent points. This is a handy mental tool for determining correct dress: when only one factor is known, the other three are immediately apparent. In other words, for any given known Purpose (X-axis,) the proper relative degrees of Location (Y-axis,) Tradition (Z-axis,) and Execution (W-axis) are revealed in their correct place.


But now, back to the Continuum Cube itself. The Dandy Axis is the average of all the values at each point of the cube. This is an important relationship: for at whichever point in the interior of the cube you may find yourself, that point will always be perpendicular to a correlating point somewhere along the length of the Dandy Axis, as well as set a certain distance apart from it.

The Dandy Axis is thus very useful in revealing instantly, in a relative way, both “how dressed” you are, as a function of the point along the Dandy Axis' length, as well as any deviation from the proper standard, as a function of your point's distance from the Axis.

It can also be a useful compass, to give you an “absolute value” of just how dressed you are compared to any other point in the Continuum Cube. Let's take an example, and a rather obvious one, that demonstrates graphically how “more dressed” doesn't necessarily equate to “more clothes.” First, we'll take a tee-shirt, flip-flops, and cargo shorts, and plot its point within the Cube.


This graphic is looking straight down along the Dandy Axis, through the cube, to its S/C/I/P apex. The cube has been “sliced” through our point on a plane perpendicular to the Axis, resulting in the small tetrahedral figure. The size of the tetrahedron indicates that our point is close to the “undress limit” of the cube. Note, too, the distance of our point from the Dandy Axis.

Now, let us compare this to a different point, this one representative of a polo shirt, Bermuda shorts, and boat shoes.


This outfit covers the same amount of skin, and fulfills the same function, as the previous one. Its relative position in the Cube, skewed toward the Historical and Formal ranges slightly, cause it to sit perpendicularly to the Dandy Axis further along its length from the “undress apex,” (indicated by the larger size of the tetrahedron; due to the larger “bite” of the cube the cut has taken) and closer to the Dandy Axis itself: resulting in being “more correctly dressed,” with the same amount of clothing. (This assumes the optimal dandy values along the W axis for each point, as well.)

With practice, you can keep the Continuum Cube in your minds' eye as you decide what to wear, place a target point within the cube along the Dandy Axis, and choose clothes that will average into that target point. By looking at what you wear in this theoretical way, and fitting it into this matrix, you needn't be operating solely on intuition and guesswork, and you will have a solid guide for making wise sartorial decisions that will never inadvertently hit wide of the mark, by being too showy, anachronistic, or situationally inappropriate...or as Brummel would say, “too stiff, tight, or fashionable.”

Click here to go back to the installment that this Appendix references.

Friday, June 8, 2012

Keeping Your Balance

Chapter 70
Dressing well is all about sartorial balance. 
Formality against informality...
Color against color... 
Pattern against pattern... 
Contemporary style against historical fashion.

Any imaginable variation on any style of fashion, in fact, must be weighed, and weighed carefully, against its opposite variation to achieve a harmonious whole. The goal is always an average between the two extremes that is not too far out of the range of normal for the particular place that you are; whether this is attending a wedding or shopping for groceries. The problem, of course, comes when a man doesn't know what to wear at all, much less how to find what an average value is, and even less how to work the extremes to maintain that balance properly. 

This is most glaring when celebrities attempt to do casual-formal wear, as we have seen recently. So we are subjected to such aberrations as a tuxedo jacket with sneakers, or a patterned shirt, or a loosely-knotted long tie, or a silly hat, or sloppy jeans. Their thinking is that the dinner jackets' formality will be offset by the other things, and the average will be dressy-casual. 

This doesn't work, of course, because the attempt to balance two polar opposites is increasingly unlikely to create a harmonious average the farther apart those extremes are. In fact, dinner dress is so extremely proscribed, it takes very little to push its balance to a place of informality: as little as a subtly-colored boutonniere, a flash of pocket square, a rakishly-designed waistcoat, or even the material of the jacket itself, is all that is needed.

Creating a balance in everyday wear is much easier than attempting the same in formalwear. Most men have a passing experience in the art of color and pattern matching. At its most basic, it is an intuitive reflex. A dark suit needs a light shirt and a bright tie, for instance; or else the suit looks muddy and somber. A light suit looks better with a patterned shirt of a darker color, and so on. Making informed decisions regarding pattern takes more experience, but is also largely intuitive. Matching a plaid shirt with a plaid tie may look busy if they are in the same color range and size, especially if paired with a plain suit; but a suit with a subtle pattern paired with a very light plaid shirt and a very strong plaid tie may look very handsome indeed. It's all in the balance created between the factors.

These basic style decisions can be complicated with variable factors such as the time of year and the immediate weather conditions. For instance, on a bright day, a pair of tan trousers may look fine with a mid-grey plain weave jacket; but on an overcast day, a darker grey herringbone jacket may look better. In the heat of summer, a shirt and tie may look overdressed in lieu of a simple polo shirt under your jacket; but in the fall, going without a tie may result in an underdressed appearance.

Another factor to balance is your immediate purpose. A matching three-piece looks official and professional for a business meeting, but a simple change out for an tattersall waistcoat looks less stuffy for an evening out. Running to the auto-parts store to buy an oil filter and spark plugs in a suit and tie may raise some eyebrows, but a hardy tweed jacket, open-collar shirt and dungarees says grungy business is at hand. A seersucker suit, loafers, and bow tie looks fine on the boardwalk, but you wouldn't wear it to church. Again, most of this is a matter of intuition for most men, once one gets past the mistake of mistaking the social average for the sartorial average.

Notice I have said nothing about shorts and tee shirts and flippy flops. These are not adult clothes, despite the depressing number of adults who wear them. Striking a balance is not about looking like the uninformed man-children surrounding you. It is about the grownup clothes you choose to wear. It is possible to be properly-dressed and not look out of place, as the above examples prove -- in fact, the proper result of a well-balanced, properly-dressed man is to make those who are not properly-dressed feel suddenly ill-at-ease and self-conscious in their own clothes, awkward and naked. This is not a result of any action on your part, nor in fact should it be: you, merely and simply dressed, should be all the catalyst necessary.

If this all seems a little overwhelming, take solace in the fact that you are not alone, nor are you solely at the mercy of your intuition. All the major factors of sartorial balance can be reduced to three continua, and these continua can be visualized and plotted against each other as axes on a three-dimensional graph.
The graph can be viewed as a cube, with any point within it defined by the three balance factors. The continuum has definite limits; it is not unbounded on all sides. The axes divide the cube into eight octants, which represent the limits of the extremes in the factors of grownup clothing. The ideal is not the exact center of the cube -- depending on external factors as noted above, the ideal for any given circumstance would describe a point somewhere in the cube's interior. The external edges of the cube are the limits of perspicacity, where clothes become costume

Let's use the Continuum Cube to demonstrate just how skewing works. We'll start at an easy point to visualize: the corner of the cube that pegs all three scales for formal, town, and historical wear. Can you guess what it is? Of course, it's the dress suit: white tie, tails, boiled-front shirt, and patent leather pumps. You can't get more formal/town/historical than that. 
As you can see, the dress suit is easily knocked off its apex by the addition of a simple boutonniere, which will skew it down the X axis, slightly away from formal. Substitute balmorals for pumps, for instance, and the skew moves toward sporty and country, and even slightly innovative, and just like that we're off the face of the cube and into the interior. This simple example demonstrates why proper white tie is as exacting as it is.

With everyday wear, you won't be dealing with the extremes, though; you will be dealing with any number of factors that will average into a value on the continuum. The Continuum Cube only works as far as the physical aspect of your clothes -- but how you wear them, your degree of insouciance and panache, can have an effect on where they skew on the Cube. 

With practice, you can keep the Continuum Cube in your minds' eye as you decide what to put on, place a target area within that cube, and choose clothes that will average into that target area. By looking at what you wear in this theoretical way, and fitting them into a matrix, you needn't be operating solely on intuition and guesswork, but have a solid guide for making wise decisions, and thus a greater opportunity to always be Dressed Like a Grownup.

Click here to go to Appendix 2, which covers the complete Continuum Cube in more depth.

Click here to go to the next essay chronologically.

Click here to go to the previous essay chronologically.

Click here to go back to the beginning.

Friday, May 18, 2012

Hemming and Hawing

(Part 14 of the series "The Island of Misfit Clothes.")
Chapter 67
This week, we return to The Island to put the finishing touches on our project jacket. To refresh your memories, we left off with all the hard work completed: trimmed down from a boxy size 46 to a trim and much more fitted size 39. Our side seams were re-worked, our shoulders re-cut and narrowed, and the sleeves re-set. From the outside, it looks like a whole new animal -- but the lining is still unattached inside, so this week we'll turn our attention there.

The first thing to do is tidy up the bottom hem. Lay out the jacket on a board, spread out flat like this. Tuck the lining up out of the way to give you room to work.

Using the outside edges as fixed points, turn under the hem to make a straight line. You may have to press some old creases out before you press the new crease in. Then stitch the turn-up in place. Since the inside won't be seen, and the hem doesn't bear any load or strain, you can use a long running pick-stitch along the inside that just catches one or two threads on the outer side. Another option is a hidden pick-stitch, that runs inside the crease and picks up a thread on both sides. There are other more specialized stitches that will also help keep the raw edge from fraying, but we won't bother with those for now.


The lining must be loose on the inside of the jacket. If it's too tight, it runs the risk of gathering the outside fabric into puckers or pulls. And if it's not attached straight down, it can make the jacket look as if it's twisting aroung you! So turn the jacket completely inside-out, and put it on your form. Smooth the lining down across the back.

Turn the lining under and pin it at the bottom edge, making sure that it is a little loose, but not hanging too far down.


Then smooth the lining across the shoulders, and pin it in place just shy of the armscye. This will make locating the lining around the shoulder a bit easier later on.

Lay the jacket on the board again, spread out as before, and run a very loose running stitch to hold it in place. Stitch the lining just underneath the fold to ensure it stays loose, and press over the stitches. There are, again, special tailor's stitches just for this area: a looping zigzag that loosely holds the lining in place but doesn't restrict its motion. It's worthwhile to learn how to do it, but it's not strictly necessary here: if you are careful to keep the lining free, a hidden pick stitch will work just fine if you don't snug the stitches at all.

You will notice that the lining is wider than the shell by several inches. Not surprising, considering how much we took out of its circumference! You needn't worry about taking any lining out: we'll just insert some pleats where needed. Before you stitch, divide the extra length along the hem into two equal parts, and put the pleats directly underneath the armholes. (Oops...Editing error! That green circle is under the existing pleat. The new one is just to the right.)

With the hem stitched and the pleats in place, press the new pleats into the lining.


Now turn your attention to the shoulders. We'll stitch the body lining around the armscye first, and then stitch the sleeve lining on top of that to get back to the original look. Starting from the front, use a hand inside the jacket to smooth the lining from the lapel to the armscye seam, and a hand outside to pin right through to the lining. It'll take every bit of your quilting pin to get through all the padding at the top of the shoulder, but it can be done.


This is what it looks like from the inside. Notice the large amount of extra lining that ends up inside the armscye.

Continue working your way around the armscye. Make use of the pins you placed in the shoulder earlier to smooth the fabric to the back of the scye. Form the pleat under the arm, that is a continuation of the pleat you made in the hem. 


You will need another pleat just behind the top of the shoulder, running to the collar seam. Pin these pleats in place. 

Make a running pick-stitch all around the armscye. From the outside, dip the needle in right at the seam, and keep the stitches fairly short, considering the depth of the padding. You aren't just holding the lining in place now, but all the padding as well. There's no need to trim the excess lining from the sleevehead, as it will sit happily where it is, and be covered by the sleeve lining.

Now it's time to add that sleeve lining. Holding the jacket vertically by the collar, reach into the sleeve from the inside and pull the lining through. Make sure it is straight and not twisted, and the top of the lining aligns with the top of the armscye. Attaching it is a simple matter of a running stitch around, right over top of the stitches you've just done, sewing lining to lining.

With all the seams completed, try the jacket on and take a good look at the overall fit. Even with careful measurement, mistakes can happen. If the lining ends up pulling a bit of the shell fabric around, re-sew that bit a little looser. We're almost done with this one! All that remain are sleeve length and button stance, and we'll tackle those issues on our next visit to The Island. Stay tuned!

Click here to go to Part Fifteen of The Island of Misfit Clothes.

Click here to go the next essay chronologically.

Click here to go back to Part Thirteen of The Island of Misfit Clothes.

Click here to go back to the previous essay chronologically.

Click here to go back to Part One of The Island of Misfit Clothes.

Click here to go back to the beginning.

Friday, March 9, 2012

Happy, Sleevey, Doc

(Part 13 of the series "The Island of Misfit Clothes")
Chapter 57


When we last left our jacket project, we were working with the sleeves. The lining and wadding were basted in place, the sleeve pitch was set, and the arms were basted into the armscye. In fact, it would look to the casual observer that we were nearly done. 

Well, almost. Now isn't the time to start cutting corners, so to speak. It is a maxim even amongst professional tailors that bad sleeves can ruin a perfectly-cut coat. Now, our sleeves are already made, so we don't have to worry about that aspect of it -- but a sleeve that has merely been badly sewn-in can be just as bad as a poorly-cut sleeve when all is said and done. Things can look "off," asymmetrical, uneven; pulls and creases can develop out of nowhere just from the weight of the sleeve itself. Now is the time, while we're still at the basting stage, to make sure the sleeves are as perfectly set as it is possible for you to get them.


The first thing to do is get out your measuring tape, and compare the two sleeves against each other. Are they the same distance from the center-back seam? Are the bottom of the arms the same depth? If they are not, you need to determine why not. When both sleeves came off, they were perfectly matched, after all. We haven't changed the sleeves themselves one whit. Are both arms put in with the same amount of round? Does one looks like a long oval, while the other is a wide oval? 

If so, now is the time to fix it. I find the top of the shoulder and down the front is less likely to be off, than down the back and under the arm, due to the thinness of the material at the back. Usually, things can move around a bit, so don't be discouraged if you find yourself a half-inch off or so when you compare the two. (I won't tell anyone if you won't.) Just take out the basting stitches along the error and try again. It's perfectly acceptable to "fudge" the shape of the armscye a bit to make both sides look even.


Basting under the arm can be especially tricky: you're working in tight quarters, in an awkward position, with thin fabric, in a critical area. You can pretty much expect to re-position this area more than once.

A common mistake is to put the back of the sleeves in too tight. You need a little ease at the blades, to give you room to move your arms. You may have seen bespoke jackets that fit very smoothly all around the arms. They are very tricky, and need a very small armscye to give the right freedom of movement. We don't have that luxury, so give yourself a half-inch or so of extra fabric; enough to pinch like this. It's called "drape," and is a legitimate way to tailor a jacket's back, so don't worry about that. Without that little bit of drape, you may find the sleeves are too restrictive.

It may take several tries to match the sleeves perfectly, but the result will be worth the extra effort you take. It's going to be necessary to try the jacket on several times, to make sure the fit and sleeve pitch is right, and you need someone who can observe you from the back and tell you if the sleeves are symmetric, well-shaped, and there are no pulls or wrinkles across the back. Even with a mirror, it's nearly impossible to do this by yourself. (Be careful not to pull out the basting threads when donning and doffing the jacket, and don't catch your arm on the edge of the sleeve lining -- it's annoyingly easy to do.)


I myself had to re-set both sleeves three times and readjust one of the side seams, before I was happy with the results. Every try will be different, so I won't bore you with endless pictures of the process. You may end up with a forest of contrast thread around the sleeve seams. That's okay...it will all be worth it. Promise.

After the last try-on, after you have the "hey--I've got it right!" moment, it's time for the final stitching. Actually, you'll stitch the sleeves twice around each. The first time will be from the outside, using the same old running backstitch with which you've become so familiar over the last few months. Remove the marking and basting stitches that get in your way as you go.

Then, from the inside, stitch together the layers of wadding, canvassing, and all, just inside the stitch you've already sewn. This will be the anchoring stitch that holds everything together against the strain of moving your arm. Make this one a single backstitch: instead of loading the needle with running stitches as you've done before, simply go two-stitches-forward-one-stitch-back, all the way around. It's a good deal stronger, with more elasticity; which is just what you need here. The trade off is that it takes a lot longer to sew. 

When you are done with the inside stitching, pull out all the basting and marking stitches that are left. Now we're getting somewhere! With the arms properly sewn in, the sleeves should flow gracefully down from the shoulders in a smooth arc, without pulls or wrinkles. (If you made my tailor's form from last year, you have "stub arms" on your shoulders, which may slightly disrupt the flow of the arms on your form. You may want to check it on a suit hanger; but of course what really matters is that it looks good when you are wearing it!


There are only a few steps that remain until our jacket project is well and truly finished -- the bottom hem has to be turned under, the lining has to go back in place, the front buttons will be set, and finally, the sleeve length will be fine-tuned. And we'll continue with that next time. Stay tuned!

Click here to go to Part Fourteen of The Island of Misfit Clothes.

Click here to go to the next essay chronologically.

Click here to go back to Part Twelve of The Island of Misfit Clothes.

Click here to go back to the previous essay chronologically.

Click here to go back to Part One of The Island of Misfit Clothes.

Click here to go back to the beginning.

Friday, February 17, 2012

Cold Shoulders

(Part 12 of the series "The Island of Misfit Clothes")
Chapter 54
This week, we're looking at sleeves, as our jacket project hurtles headlong toward completion. In the process, we're going to see an excellent example of minimizing fit flaws by chasing down the errors, minimizing them at each turn, until they either disappear, or reach a point that you can live with them.

We've started with a three-piece suit that was, just for the point of illustration, fit wrong in just about every way imaginable. The jacket, for instance, was a size 46, with huge shoulders and a shape like a barrel. Over the weeks, we've trimmed it to a size 39, nipped in the waist, narrowed the shoulders, and gotten it to fit a very particular stance -- all without mucking about with the hard parts: the fronts, collar, and lapels. All the seams we've dealt with are plain and simple, and the stitches easy to do. In short, all the tools an Average Guy needs to tailor his own duds without the need of pricey professionals.

We're going to continue with the assumption that you've retained the knowledge gleaned through the previous parts of the series. If it seems like I'm going too fast or not giving enough detail, it's because we've covered that stuff in previous weeks. Ready? Off we go...


Re-arrange the jacket on the form. Make sure the back seam is straight, and then smooth down the fronts. Now from here, we can take one of two paths. Up till now, we've taken out the extra length in the front balance by moving the fabric down and to the rear, and eliminating it at the side seams. Depending on your amount of shoulder asymmetry, the pocket heights and lapel notches may differ by a half inch or so; I'm not bothered by it, and most people wouldn't even notice it. It's a lot less work to live with the asymmetry, so to continue in this vein, you can skip most of the shoulder-work later on in the post, and go straight to the task of setting the sleeves.

However, for the sake of example, just for you, I'll play the martyr and show you how to do the extra work to make the fronts even again. (You're welcome.) Lift the low shoulder, smoothing it over toward the back and down the fronts, to make sure everything is absolutely symmetric and just-so between both sides. (In the pic, I'm smoothing back with my left hand as I'm holding the opposite lapel in place with my right.)

Remember, though, that by making the fronts perfectly even again, we're undoing some of the work we've done in previous steps. Instead of down and to the rear, we're taking the excess length up and over the shoulder. This will throw the extra fabric over the blades on one side: it will have to be removed by reworking the shoulder seam. It will also pull up the front on that side in relation to the back: and that means your side seam may have to be re-sewn slightly higher. Since you have already sewn that seam once, re-doing it shouldn't pose too great a problem, though.


Now on to the sleeves.

Take the center fronts, pinch them together like this (not overlapping as usual) and pin them together to keep the jacket in place.

Now take out your sleeves, (if you haven't misplaced them by now!) and your marking-thread.

Run a few lines of long, running stitches to hold the padding and wadding in place inside the sleeve -- you don't want it falling out at an inopportune time!

Baste the lining around the armscye as well. This will keep it from bunching up in the bottom of the sleeve, keep it from twisting, and help the sleeve fall naturally.

The basting stitches, running around the sleevehead.


The sleeve ready to set.


Now it's time to set the sleeve pitch. Put the sleeve in place and pin it at the top. Look at the way you hold your arms naturally, and rotate the sleeve to match your own stance. If you naturally hold your arms too far backward or forward compared to your sleeves, they will wrinkle and pull oddly when you wear the jacket.

Use chalk to mark where the shoulder seam meets the sleevehead.

Remove the sleeve again, and mark stitch along the seam around the armscye.

Replace the sleeve. Line up the chalk marks and the mark stitching. Baste the sleevehead in place, starting from the turn under at the front side, over the crown...

...and down the back to the same point. Then go back to the point where you started, and baste down, under, and around to the back side.

This leaves the back shoulder unbasted. Tie the stitch off (the green circle.) You may notice one of three things at this point. 
(1) The remaining sleeve can sew into the back perfectly. If you didn't choose to re-position the fronts as I did, this is the most likely outcome, and you can continue to baste up the armscye with no trouble.
(2) There may be a little extra back seam length left over, usually if you have extra-prominent shoulder blades or a round back. You can ease in the extra length, by gathering it in with a running stitch, sponging the fabric, and shrinking it in with an iron. Working with a tailor's ham rolled to shape and a bit of patience can shrink the seam into place, and give you some extra blade-room at the same time. (What's a ham? Read on...we'll use it later.)
(3) Or [exaggerated here,] there may be a heaping lot left at the back. The extra fabric isn't surprising in this case -- this is my lower shoulder, and when I determined to arrange the fronts symmetrically and smoothed the extra fabric back, that extra fabric had to go somewhere: and that somewhere is here. I warned you:  it was going to be more work this way!


Let's make that fabric go away. Baste up the back armscye as far as you can, pulling the fabric smooth across the back as you go.


You will have a little loop of fabric left over at the base of the sleevehead.


Now remove the basting stitches up to the top of the shoulder seam.

Then unzip the stitches along the shoulder seam itself, from just beside the collar out to the sleeve. You can probably see what we're going to do: that extra fabric is going to disappear in the shoulder seam.

Hold the base of the armscye with your left hand, and with your right, hold on and stretch the fabric over the shoulder seam, as shown. Use your iron to steam the fabric a bit if needed. The arrows show the direction of the stretch. You don't want it tight -- you're just encouraging the fabric to sit naturally and smoothly over the blades.

Re-baste the armscye the rest of the way around.

Fold back the new shoulder seam and thread mark it.

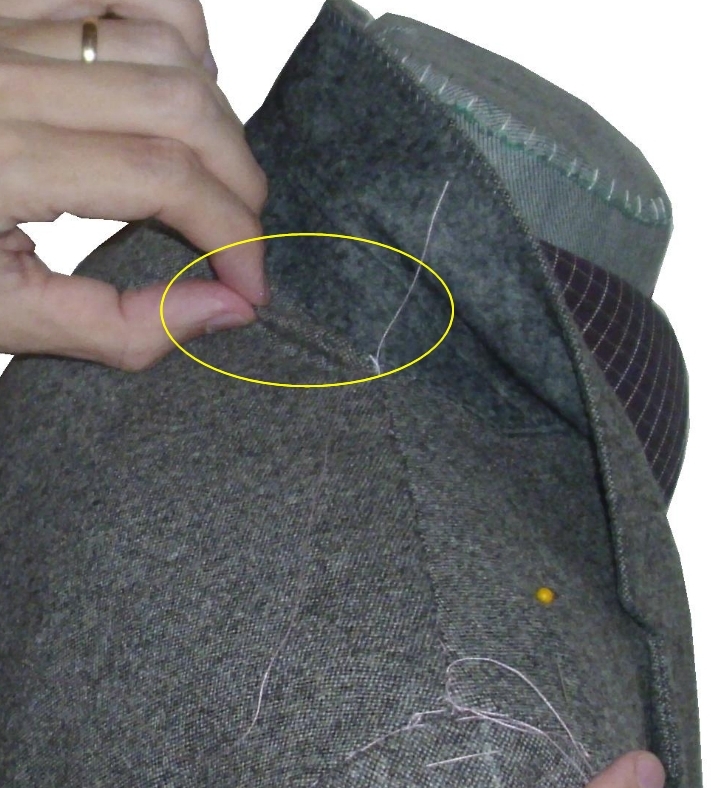
Baste the shoulder seam in place with smallish stitches and snug it firmly. Now the extra length has been displaced to just a little pinch right behind the collar melton.

So let's get rid of that last bit. Unzip the base of the collar melton where the extra fabric is...

And smooth the back up inside the collar, while you smooth the collar down over the back. Baste the collar in place.

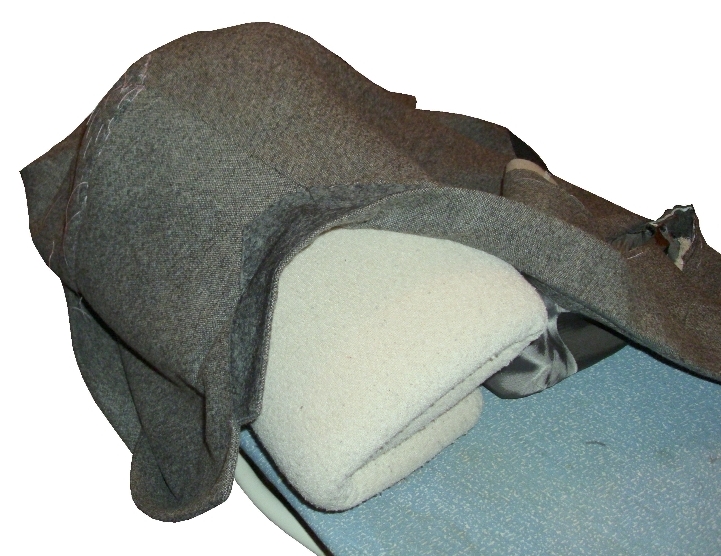
Finish stitch the collar (using the same zigzag stitches as the rest of the collar) and the shoulder seam with a running backstitch. Notice that the shoulder seam has a curve to it: try to duplicate it as best as you can. It is quite helpful to do this off of the form, on what tailors call a ham: a tightly-rolled towel on your ironing board that gives shape to the shoulder while you work. Steam and press the seam quite flat to match the other shoulder. Now is the time to pay attention to the side seam under that arm, and made sure it is laying flat and true...and if it isn't, re-do it. As mentioned earlier, it will probably need a slight re-positioning. The other sleeve should set in much easier, without all the shoulder-work, so do that now. Next time, the final stitching of the armscyes.

As you can see, much of what we do with this sort of alteration is all about compromises. A professional tailor would take off the collar and the back panel, re-sew the back in place and re-set the collar, and re-cut the sleeves and armscye to match perfectly. That is a whole lot of work. We are accomplishing much the same thing, much easier, for free, with very acceptable results. Most importantly, we are creating a jacket that, although not perfect in all points, is worlds better than it was.

Click here to go to Part Thirteen of The Island of Misfit Clothes.

Click here to go to the next essay chronologically.

Click here to go back to the previous essay chronologically, Part Eleven of The Island of Misfit Clothes.

Click here to go back to Part One of The Island of Misfit Clothes.

Click here to go back to the beginning.