Friday, February 17, 2012

Cold Shoulders

(Part 12 of the series "The Island of Misfit Clothes")
Chapter 54
This week, we're looking at sleeves, as our jacket project hurtles headlong toward completion. In the process, we're going to see an excellent example of minimizing fit flaws by chasing down the errors, minimizing them at each turn, until they either disappear, or reach a point that you can live with them.

We've started with a three-piece suit that was, just for the point of illustration, fit wrong in just about every way imaginable. The jacket, for instance, was a size 46, with huge shoulders and a shape like a barrel. Over the weeks, we've trimmed it to a size 39, nipped in the waist, narrowed the shoulders, and gotten it to fit a very particular stance -- all without mucking about with the hard parts: the fronts, collar, and lapels. All the seams we've dealt with are plain and simple, and the stitches easy to do. In short, all the tools an Average Guy needs to tailor his own duds without the need of pricey professionals.

We're going to continue with the assumption that you've retained the knowledge gleaned through the previous parts of the series. If it seems like I'm going too fast or not giving enough detail, it's because we've covered that stuff in previous weeks. Ready? Off we go...


Re-arrange the jacket on the form. Make sure the back seam is straight, and then smooth down the fronts. Now from here, we can take one of two paths. Up till now, we've taken out the extra length in the front balance by moving the fabric down and to the rear, and eliminating it at the side seams. Depending on your amount of shoulder asymmetry, the pocket heights and lapel notches may differ by a half inch or so; I'm not bothered by it, and most people wouldn't even notice it. It's a lot less work to live with the asymmetry, so to continue in this vein, you can skip most of the shoulder-work later on in the post, and go straight to the task of setting the sleeves.

However, for the sake of example, just for you, I'll play the martyr and show you how to do the extra work to make the fronts even again. (You're welcome.) Lift the low shoulder, smoothing it over toward the back and down the fronts, to make sure everything is absolutely symmetric and just-so between both sides. (In the pic, I'm smoothing back with my left hand as I'm holding the opposite lapel in place with my right.)

Remember, though, that by making the fronts perfectly even again, we're undoing some of the work we've done in previous steps. Instead of down and to the rear, we're taking the excess length up and over the shoulder. This will throw the extra fabric over the blades on one side: it will have to be removed by reworking the shoulder seam. It will also pull up the front on that side in relation to the back: and that means your side seam may have to be re-sewn slightly higher. Since you have already sewn that seam once, re-doing it shouldn't pose too great a problem, though.


Now on to the sleeves.

Take the center fronts, pinch them together like this (not overlapping as usual) and pin them together to keep the jacket in place.

Now take out your sleeves, (if you haven't misplaced them by now!) and your marking-thread.

Run a few lines of long, running stitches to hold the padding and wadding in place inside the sleeve -- you don't want it falling out at an inopportune time!

Baste the lining around the armscye as well. This will keep it from bunching up in the bottom of the sleeve, keep it from twisting, and help the sleeve fall naturally.

The basting stitches, running around the sleevehead.


The sleeve ready to set.


Now it's time to set the sleeve pitch. Put the sleeve in place and pin it at the top. Look at the way you hold your arms naturally, and rotate the sleeve to match your own stance. If you naturally hold your arms too far backward or forward compared to your sleeves, they will wrinkle and pull oddly when you wear the jacket.

Use chalk to mark where the shoulder seam meets the sleevehead.

Remove the sleeve again, and mark stitch along the seam around the armscye.

Replace the sleeve. Line up the chalk marks and the mark stitching. Baste the sleevehead in place, starting from the turn under at the front side, over the crown...

...and down the back to the same point. Then go back to the point where you started, and baste down, under, and around to the back side.

This leaves the back shoulder unbasted. Tie the stitch off (the green circle.) You may notice one of three things at this point. 
(1) The remaining sleeve can sew into the back perfectly. If you didn't choose to re-position the fronts as I did, this is the most likely outcome, and you can continue to baste up the armscye with no trouble.
(2) There may be a little extra back seam length left over, usually if you have extra-prominent shoulder blades or a round back. You can ease in the extra length, by gathering it in with a running stitch, sponging the fabric, and shrinking it in with an iron. Working with a tailor's ham rolled to shape and a bit of patience can shrink the seam into place, and give you some extra blade-room at the same time. (What's a ham? Read on...we'll use it later.)
(3) Or [exaggerated here,] there may be a heaping lot left at the back. The extra fabric isn't surprising in this case -- this is my lower shoulder, and when I determined to arrange the fronts symmetrically and smoothed the extra fabric back, that extra fabric had to go somewhere: and that somewhere is here. I warned you:  it was going to be more work this way!


Let's make that fabric go away. Baste up the back armscye as far as you can, pulling the fabric smooth across the back as you go.


You will have a little loop of fabric left over at the base of the sleevehead.


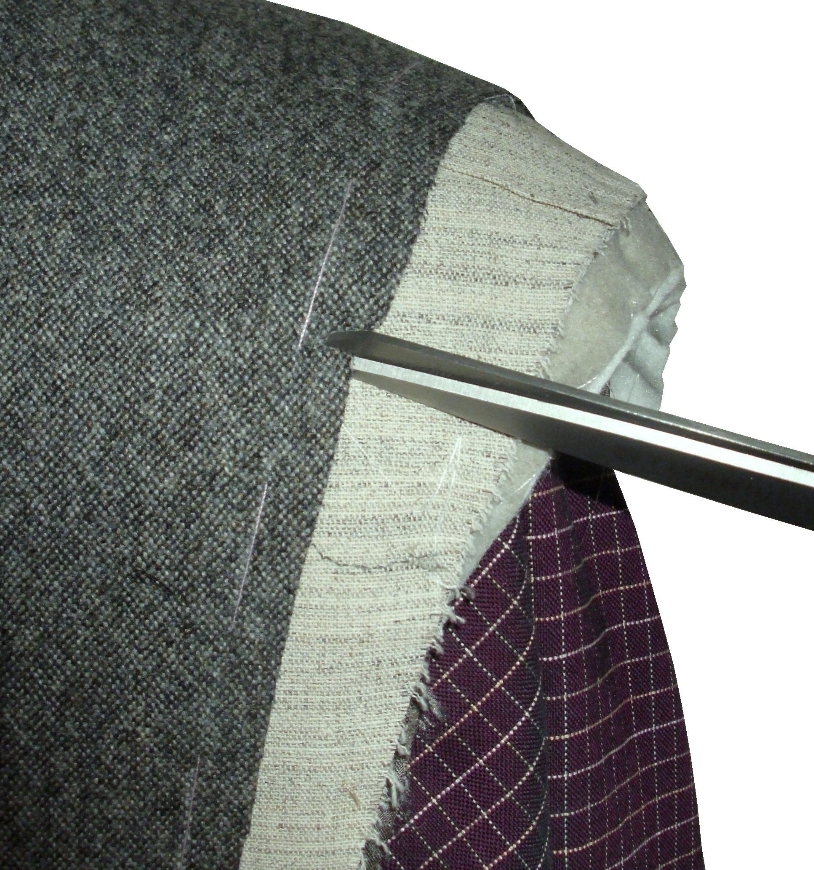
Now remove the basting stitches up to the top of the shoulder seam.

Then unzip the stitches along the shoulder seam itself, from just beside the collar out to the sleeve. You can probably see what we're going to do: that extra fabric is going to disappear in the shoulder seam.

Hold the base of the armscye with your left hand, and with your right, hold on and stretch the fabric over the shoulder seam, as shown. Use your iron to steam the fabric a bit if needed. The arrows show the direction of the stretch. You don't want it tight -- you're just encouraging the fabric to sit naturally and smoothly over the blades.

Re-baste the armscye the rest of the way around.

Fold back the new shoulder seam and thread mark it.
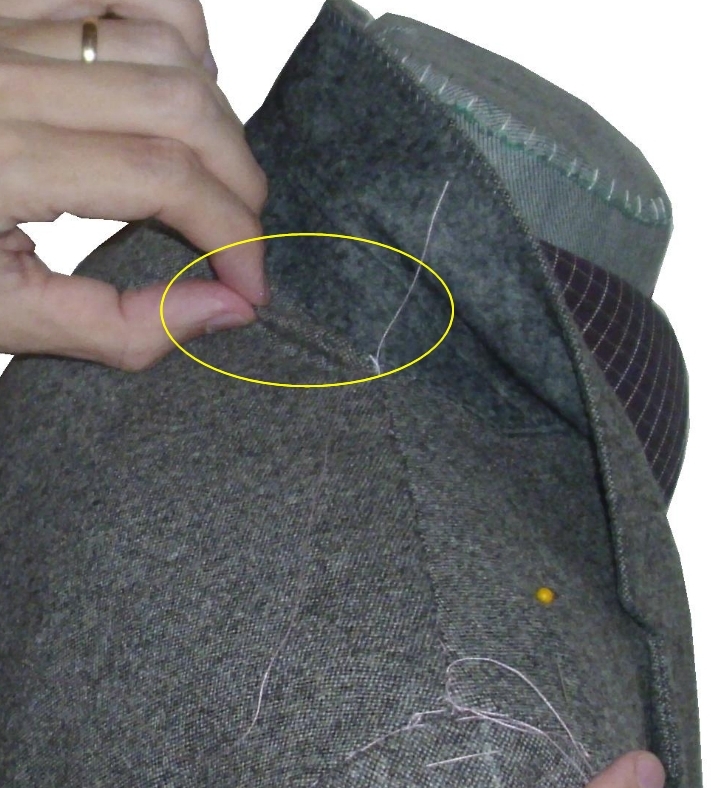
Baste the shoulder seam in place with smallish stitches and snug it firmly. Now the extra length has been displaced to just a little pinch right behind the collar melton.

So let's get rid of that last bit. Unzip the base of the collar melton where the extra fabric is...

And smooth the back up inside the collar, while you smooth the collar down over the back. Baste the collar in place.
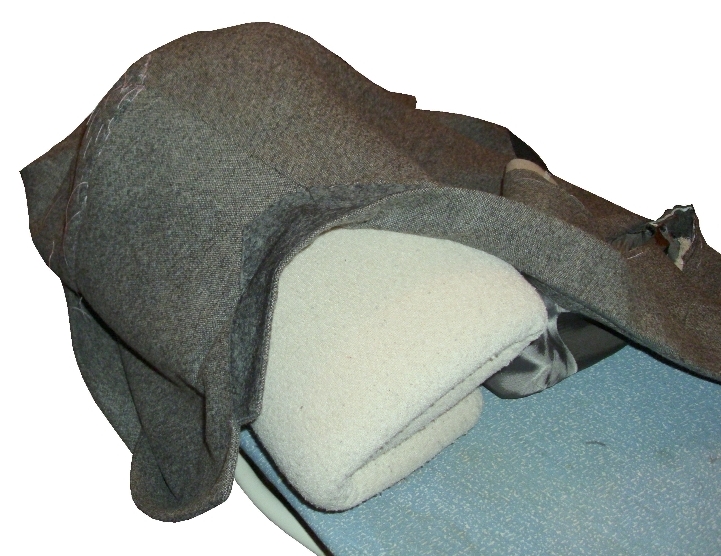
Finish stitch the collar (using the same zigzag stitches as the rest of the collar) and the shoulder seam with a running backstitch. Notice that the shoulder seam has a curve to it: try to duplicate it as best as you can. It is quite helpful to do this off of the form, on what tailors call a ham: a tightly-rolled towel on your ironing board that gives shape to the shoulder while you work. Steam and press the seam quite flat to match the other shoulder. Now is the time to pay attention to the side seam under that arm, and made sure it is laying flat and true...and if it isn't, re-do it. As mentioned earlier, it will probably need a slight re-positioning. The other sleeve should set in much easier, without all the shoulder-work, so do that now. Next time, the final stitching of the armscyes.

As you can see, much of what we do with this sort of alteration is all about compromises. A professional tailor would take off the collar and the back panel, re-sew the back in place and re-set the collar, and re-cut the sleeves and armscye to match perfectly. That is a whole lot of work. We are accomplishing much the same thing, much easier, for free, with very acceptable results. Most importantly, we are creating a jacket that, although not perfect in all points, is worlds better than it was.

Click here to go to Part Thirteen of The Island of Misfit Clothes.

Click here to go to the next essay chronologically.

Click here to go back to the previous essay chronologically, Part Eleven of The Island of Misfit Clothes.

Click here to go back to Part One of The Island of Misfit Clothes.

Click here to go back to the beginning.

Friday, February 10, 2012

Things Start Coming Together.

(Part 11 of the series "The Island of Misfit Clothes")
Chapter 53
Today, we reach a tipping-point on our reconfiguring tour through our outsized three-piece suit! All those weeks of measuring, marking, ripping, cutting, and marking again are finally coming to a middle. It can get disheartening to take on a big project like this, when things go to pieces and stay there...it seems like you've bitten off too much, or the eventual payoff can't possibly be worth all this work. Well, this week you'll see some light at the end of the tunnel: for our side seams are coming together for good, and our jacket is on the short side of completion.

When we left our jacket, it was sitting on the tailor's form, with the side seams basted in place. Let's take a look at the hem of the jacket before we start. You'll notice that the back is shorter than the sides; that's a side effect of shifting the balance away from the fronts. Notice that the right side is longer than the left, as well: a side-effect of correcting for my slightly low right shoulder. We'll fix that as we go. It's easier to do the final stitching with the jacket in your hands, so off the form it goes.

Lay it out on an ironing board, and warm up your iron as you did last time.  We want to equalize the hem length all the way around, and start the finished seams at the very end of the hem; so unfold the turn-under at the back. The green arrows show the disparity of length between the two sides.

Unfold the turn-unders at the sides as well, as far as you can.

Take your razor knife and release any pick-stitches that may be holding the turn-under in place. (No need to go all the way to the front.)

There we go. Much better. There's plenty of fabric now to use for the new turn-unders. (This jacket has black linen sewn into the edges, to help hold the turn-unders up...yours may or may not have them, they're not standard equipment.) Unfold both sides, and steam out the creases, using the technique we practiced last time.

Here's the back edge, all laid out and ironed flat. The red line shows where our finished hem will eventually be.

Now, lay out the jacket like this, with the basted seam front-and-center, with the hem edge closest to you. Get out needle and thread in a color that matches the fabric -- pull out a length about a fifth longer than the seam length itself -- and prepare to do some sewin'. If you can manage working in your lap, cross-legged in true tailor's style, bravo for you! It's also quite acceptable to do this work sitting in a comfy chair, or (if you must) working at a table. Relax your shoulders and don't tense up. Don't work up close to your eyes too much after you get a feel of what you're doing, either. Tailoring isn't fun with knotted shoulders, cramped fingers, and a splitting headache. 

There's a pleasant zen component to needling done well. With practice, you will be able to sew as much by feel as by sight. Take it easy, don't try to force your way through it, and if you need to take a break, do. Remember there are people who have done this ten hours a day for sixty years; so if your hand feels like it's going to fall off after ten minutes, step back and think through what you're doing wrong with your technique. Relax your arms, keep your back straight, and breathe.

We'll use a running backstitch for the seams. It's easy to do, fairly quick, and is done from the frontside of the fabric so you can see your progress. The first thing, though, is to anchor the end of the seam with a small tack stitch: just three tiny horizontal stitches that just catch each side of the seam, like this, and pull it snug.

There; that's tight. Now; onto the stitch. 

Here's how it's done. [top graphic:] Run the needle up the middle of the seam, taking a small bite out of one side, then a small bite out of the other. Load the stitches up the needle, so the fabric pulls in a zigzag on either side. Use the finger and thumb of your left hand to pinch the seam together, and your right hand to work the needle in. With a little practice you can do this totally by feel. Take stitches as small as you can; aim for 6 or 8 stitches piled on the needle. [center graphic:] When the needle's full, push it through, and bring the needle back in just behind the last stitch. [bottom graphic:] Pull the stitches snug, then load the needle again. The single backstitch will hold the eight running stitches in place. There's no need to crank the stitches tight; just enough to hold the fabric firmly together. A good stitch will be a little elastic, and besides, if something rips in the future, you want it to be the seam that gives way and not the fabric.

Here's how it looks in action. Notice the position of my left hand. I'm pushing the end of the needle through with my right thumb, you can see the tip of the needle coming through further up, with the zigzag of the fabric on the needle...

...Here's the needle going in for the backstitch...

...and the first run of stitches after the backstitch-and-snug motion.

(Take out the pink thread ahead of you as you go; it'll save you some trouble later.)

Now we're about a third of the way up. Notice the three pink threads ahead of the stitch: remember there are marking stitches for both sides and the basting stitch to remove!

At the top of the seam already! It does go quickly once you get the rhythm. Notice the way I gather the fabric in my left hand as I work my way up the seam. 

The seam completed. You will see some puckers and gathers along the way. "Oh no!" you may think -- don't worry, they'll press out.

Arrange the seam straight down your ironing board, like this, and smooth it taut as best you can. Then steam it flat. Don't iron the whole side -- just the seam. There's existing shaping over the hips and shoulders that you don't want to derange with the iron.


The seam as it should look after pressing.


...


Now, all that remains is to do the exact same thing, for the other side.

Now we're seeing some real progress! Put your jacket on; dance around the house in it, admire yourself in it in the mirror. Go ahead, you've deserved it. Can you believe this was a size 46? It feels like it was made just for you.


Because it is, now.

When you're finished admiring your handiwork, replace your jacket on the tailor's form...we're not quite done this week! Now that the body's complete (and doesn't it feel good to say that) let's turn our attention to the shoulders. 

Your jacket may or may not have the top part of the seam turned under like this one, so that the sleevehead sits even with the shoulder and doesn't stand proud. Some jackets have pronounced "roping" in the sleeveheads to give the opposite effect; it's just a matter of fashion. Notice where the ends of the turn-in are located if you have them... you'll need that later.


We have the new position of the shoulder already marked; now we just trim the excess off, leaving about ½". Only trim the shell fabric; not the canvas or cotton.


Here's the armscye after trimming.


Now make small snips where the ends of the turn-in were...


...fold the turn-in right at the marked line...


...and steam it in place with an iron, right on the form.


Now we can cut back the canvas layers to match the new shoulder point. Snip with scissors, along this line.


Then snip the cotton batting layers, along this line.

This causes another problem to deal with. The cotton you've just cut was gradually feathered and tapered out to the edge, and what you have now is a wall of cotton wadding, as you can see here. If there is a protective layer of interfacing on top of the cotton, fold it back...


...and snip the cotton at a shallow angle to shave it back to a tapered shape. Work as far under as your stitchmarked armscye line, and feather the padding down to nearly nothing at the edge.


Here's your finished shoulder line, trimmed and padded and ready to be re-introduced to your sleeves. 


And that's where we'll pick up next time: setting the sleeve pitch and re-attaching the sleeves. Stay tuned!

Friday, February 3, 2012

SAG Like A Gansta In The Quarter-Formals, Yo!

Chapter 52
Awards shows are coming thick and fast this time of year! The Director's Guild of America awards came and went with no press or fanfare to speak of, because who wants to see directors? The SAG awards, on the other hand, got the usual prime-time treatment; actors being so much more telegenic and all. 

Unlike the other big awards shows, the Screen Actor's Guild (the actors' labor union; because apparently actors need leverage for higher wages) is unique in that the actors basically give themselves awards. If this sounds self-serving, that's because it is, thank you very much, and they give no apology for that. They will insist that the SAGs focus is the serious business of The Craft rather than mere popular celebrity, and I'm sure there are some that actually believe that. The tone is purposefully a bit more laid-back than the Globes or Oscars -- the participants sit at tables swilling booze instead of perched on theater seats, and a strange form of formal wear has developed among the men; a sort of Black Tie Lite.

Women are very attuned to shades of formality for any given function. Indeed, the dresses at any given event largely set the tone for that function. Mens' formal wear has historically been the visual background upon which the dresses operate -- that is, in fact, its function. White Tie is full formal; Black Tie is semi-formal. Variation within that is restricted to details of cut, not of the variation of formality itself.  

At least, it used to be. Men have apparently gotten confused on this point, and have applied shades of formality to their clothes as well. This is because men have forgotten how to dress, and have started looking to women for direction. As a result, the SAG Awards, already saddled with the burden of the appearance of a dress-down affair, has done very little to champion the cause of proper men's wear. 

You will notice I make no mention of who the famous-maker labels are when I cast my critical eye at the stars' (ahem) "tuxedo" choices. This is intentional. What makes a good tuxedo has nothing to do with the stylist who made it. It has everything to do with fit, with proportion, with the harmonization of the lines of the suit to the personality of the wearer. By divorcing the name from the suit, there will be no temptation to think that a horrid tuxedo is somehow made more acceptable because of the famous designer behind it: let it stand or fall on its own merits.

Any pretense of Black Tie in many cases was completely dispensed with, and goofy shoes, loud ditto suits, and open collars were a-plenty. We shan't even discuss such aberrations here. Women can get away with such variations. Men should not.

What was noticeable is the preponderance of simple black suits. It's almost as if there is a new semi-formal: a semi-semi-formal -- a quarter-formal, if you will -- comprised of chunky shoes, low-rise black pants, skinny black long tie with white shirt, and black jacket. The jacket may be plain, or with some sort of edging on the lapels and trim, but they are noticeably not  traditional dinner jackets.

A prevalence of wrong, however, does not make a right. Let's take a brief look at the "quarter-formal" craze on parade this week.

Bryan Cranston's beautifully-cut black suit is still a suit. Elegant attire for a funeral...not a party. 

The Pitt and The Clooney, in stark contrast to their acceptable turnout at the Golden Globes recently, appeared in "quarter-formals." Shawl collars like Clooney's, perceived as the least formal lapel style, were popular among the few attendees who opted for a proper dinner jacket at all.

Steve Buscemi, who nearly always appears in a long tie, regardless of its propriety, at least deserves a bravo here. Long derided by me for wearing poorly-fitting tuxedos, he seems to have at long last found one that fits him. Still, narrow lapels do nothing for Steve, as you can see here. A generous "belly" on the shawl lapels and a bow tie would have made this outfit truly pulchritudinous.

No amount of preparation from handlers or agents can compensate for sheer stupidity. Judah Friedlander apparently can't separate person from punchline. This is just beyond stomach-churningly atrocious, a reprehensible manifestation of his deficiency of character. He should never have been allowed through the door looking so offensive. It is an affront to everything that the Screen Actors Guild is supposed to stand for: respect for acting as a collaborative art. What a self-absorbed, egotistical, conceited excuse for a thespian.

Thankfully, some actors knew enough to know what Black Tie means, and held firm against the quarter-formal trend. Notable for his precision was Armie Hammer, who wore an expertly tailored tuxedo. It's rather severe lines were a perfect complement to Elizabeth Chambers' minimal dress. 
A simple cummerbund would have rendered this execution transcendent.


"It's after six -- what am I, a savage?"
Alec Baldwin, not surprisingly, was similarly appropriate. Seems he's learned something from his character on 30Rock, Jack Donaghy.


What do we make of this bizarre quarter-formal trend? First, it's the natural declension when semi-formal becomes equated with full-formal. We mustn't forget that Formal evening wear is White Tie, technically called a Dress Suit. It's comprised of a body coat with tails, matching white pique bow tie and waistcoat, stiff-front shirt with detachable wing collar, and formal pumps. It's the most formal "uniform" that a civilian can wear.  It is also not to be forgotten that White Tie is essentially a party outfit, worn to fun events where there may be dancing, games, and laughing. It is not a somber or serious mode of dress. All the events that we see today as Black Tie, were at one time required to be White Tie.

Black Tie, technically called Dinner Dress, is NOT formalwear. It is SEMI-formal. It only became acceptable to wear the Tuxedo (its Americanized name) in mixed company in the last century. The origin is in loungewear: a sack-cut jacket with matching grosgrain lapels, bow tie, and waistcoat, worn with a fold-collar button-front shirt and balmorals. It was a more comfortable, looser-fitting suit to wear after dinner. Only after it became a commonly used dinner suit, did it become standard to wear Black Tie to events previously considered formal.

Full Dress and Dinner Dress have been traditionally worn side-by-side at events: the two are not mutually exclusive. Those who could not afford the proper attire could thus substitute the best they could afford, even if it was less than ideal. (And make no mistake: Full Dress is a shockingly expensive bespoke bit of tailoring!)

There has never been a need to have anything less formal than semi-formal. Black Tie is comfortable, easy to wear, elegant, and has been refined over the decades to the point that its proportions have been perfected. Yet for some reason, Black Tie today is perceived as stuffy and rigid, and a need is seen to pull away from this imagined austerity into --what? The new quarter-formal? A black suit?

Let's hope not. Black Tie as it exists serves an important function as semi-formal evening wear. It is flexible enough to be seen in a variety of venues, from simple dinners out, to extremely formal affairs just "one notch removed" from White Tie. It shows the people you are with, that you think of them with admiration and respect. It demonstrates an affinity with, and knowledge of, the past, and a continuity with history. It establishes that you know the rules, and are willing to show yourself as equal in all measures to the men with whom you are sharing your time. Black Tie is not a stagnant fashion, but timeless style that transcends the ages. The aberrant quarter-formal will find its way to the dustbin eventually, and the sooner they are, the better. Don't be found a fashion victim...when the venue calls for semi-formal, do it properly.