(Part 12 of the series "The Island of Misfit Clothes")
Chapter 54
This week, we're looking at sleeves, as our jacket project hurtles headlong toward completion. In the process, we're going to see an excellent example of minimizing fit flaws by chasing down the errors, minimizing them at each turn, until they either disappear, or reach a point that you can live with them.
We've started with a three-piece suit that was, just for the point of illustration, fit wrong in just about every way imaginable. The jacket, for instance, was a size 46, with huge shoulders and a shape like a barrel. Over the weeks, we've trimmed it to a size 39, nipped in the waist, narrowed the shoulders, and gotten it to fit a very particular stance -- all without mucking about with the hard parts: the fronts, collar, and lapels. All the seams we've dealt with are plain and simple, and the stitches easy to do. In short, all the tools an Average Guy needs to tailor his own duds without the need of pricey professionals.

Re-arrange the jacket on the form. Make sure the back seam is straight, and then smooth down the fronts. Now from here, we can take one of two paths. Up till now, we've taken out the extra length in the front balance by moving the fabric down and to the rear, and eliminating it at the side seams. Depending on your amount of shoulder asymmetry, the pocket heights and lapel notches may differ by a half inch or so; I'm not bothered by it, and most people wouldn't even notice it. It's a lot less work to live with the asymmetry, so to continue in this vein, you can skip most of the shoulder-work later on in the post, and go straight to the task of setting the sleeves.
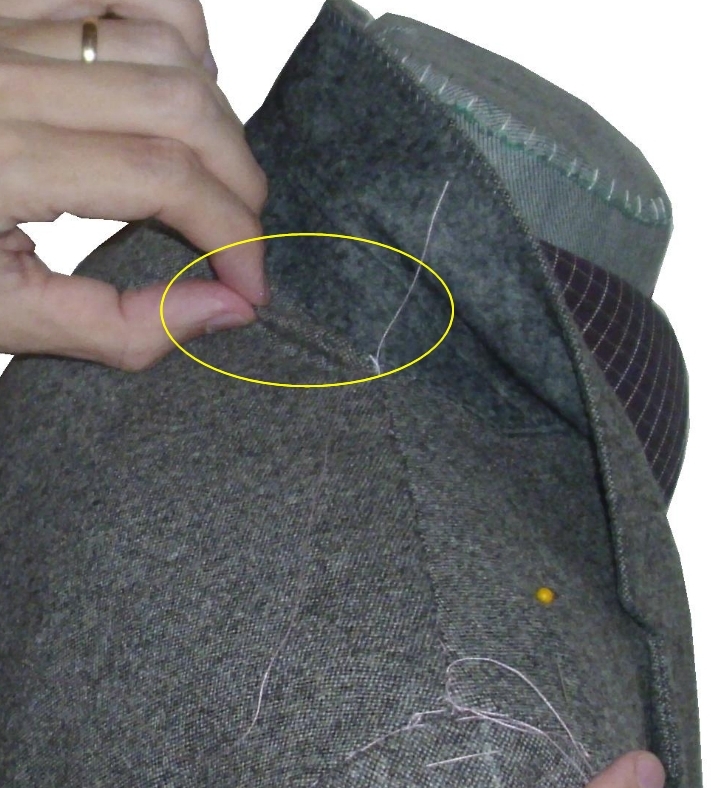
However, for the sake of example, just for you, I'll play the martyr and show you how to do the extra work to make the fronts even again. (You're welcome.) Lift the low shoulder, smoothing it over toward the back and down the fronts, to make sure everything is absolutely symmetric and just-so between both sides. (In the pic, I'm smoothing back with my left hand as I'm holding the opposite lapel in place with my right.)
Remember, though, that by making the fronts perfectly even again, we're undoing some of the work we've done in previous steps. Instead of down and to the rear, we're taking the excess length up and over the shoulder. This will throw the extra fabric over the blades on one side: it will have to be removed by reworking the shoulder seam. It will also pull up the front on that side in relation to the back: and that means your side seam may have to be re-sewn slightly higher. Since you have already sewn that seam once, re-doing it shouldn't pose too great a problem, though.

Now on to the sleeves.
Take the center fronts, pinch them together like this (not overlapping as usual) and pin them together to keep the jacket in place.

Now take out your sleeves, (if you haven't misplaced them by now!) and your marking-thread.

Run a few lines of long, running stitches to hold the padding and wadding in place inside the sleeve -- you don't want it falling out at an inopportune time!

Baste the lining around the armscye as well. This will keep it from bunching up in the bottom of the sleeve, keep it from twisting, and help the sleeve fall naturally.

The basting stitches, running around the sleevehead.

The sleeve ready to set.

Now it's time to set the sleeve pitch. Put the sleeve in place and pin it at the top. Look at the way you hold your arms naturally, and rotate the sleeve to match your own stance. If you naturally hold your arms too far backward or forward compared to your sleeves, they will wrinkle and pull oddly when you wear the jacket.

Use chalk to mark where the shoulder seam meets the sleevehead.

Remove the sleeve again, and mark stitch along the seam around the armscye.

Replace the sleeve. Line up the chalk marks and the mark stitching. Baste the sleevehead in place, starting from the turn under at the front side, over the crown...

...and down the back to the same point. Then go back to the point where you started, and baste down, under, and around to the back side.

This leaves the back shoulder unbasted. Tie the stitch off (the green circle.) You may notice one of three things at this point.
(1) The remaining sleeve can sew into the back perfectly. If you didn't choose to re-position the fronts as I did, this is the most likely outcome, and you can continue to baste up the armscye with no trouble.
(2) There may be a little extra back seam length left over, usually if you have extra-prominent shoulder blades or a round back. You can ease in the extra length, by gathering it in with a running stitch, sponging the fabric, and shrinking it in with an iron. Working with a tailor's ham rolled to shape and a bit of patience can shrink the seam into place, and give you some extra blade-room at the same time. (What's a ham? Read on...we'll use it later.)
(3) Or [exaggerated here,] there may be a heaping lot left at the back. The extra fabric isn't surprising in this case -- this is my lower shoulder, and when I determined to arrange the fronts symmetrically and smoothed the extra fabric back, that extra fabric had to go somewhere: and that somewhere is here. I warned you: it was going to be more work this way!

Let's make that fabric go away. Baste up the back armscye as far as you can, pulling the fabric smooth across the back as you go.

You will have a little loop of fabric left over at the base of the sleevehead.

Now remove the basting stitches up to the top of the shoulder seam.

Then unzip the stitches along the shoulder seam itself, from just beside the collar out to the sleeve. You can probably see what we're going to do: that extra fabric is going to disappear in the shoulder seam.

Hold the base of the armscye with your left hand, and with your right, hold on and stretch the fabric over the shoulder seam, as shown. Use your iron to steam the fabric a bit if needed. The arrows show the direction of the stretch. You don't want it tight -- you're just encouraging the fabric to sit naturally and smoothly over the blades.

Re-baste the armscye the rest of the way around.

Fold back the new shoulder seam and thread mark it.
Baste the shoulder seam in place with smallish stitches and snug it firmly. Now the extra length has been displaced to just a little pinch right behind the collar melton.

So let's get rid of that last bit. Unzip the base of the collar melton where the extra fabric is...

And smooth the back up inside the collar, while you smooth the collar down over the back. Baste the collar in place.

Finish stitch the collar (using the same zigzag stitches as the rest of the collar) and the shoulder seam with a running backstitch. Notice that the shoulder seam has a curve to it: try to duplicate it as best as you can. It is quite helpful to do this off of the form, on what tailors call a ham: a tightly-rolled towel on your ironing board that gives shape to the shoulder while you work. Steam and press the seam quite flat to match the other shoulder. Now is the time to pay attention to the side seam under that arm, and made sure it is laying flat and true...and if it isn't, re-do it. As mentioned earlier, it will probably need a slight re-positioning. The other sleeve should set in much easier, without all the shoulder-work, so do that now. Next time, the final stitching of the armscyes.
As you can see, much of what we do with this sort of alteration is all about compromises. A professional tailor would take off the collar and the back panel, re-sew the back in place and re-set the collar, and re-cut the sleeves and armscye to match perfectly. That is a whole lot of work. We are accomplishing much the same thing, much easier, for free, with very acceptable results. Most importantly, we are creating a jacket that, although not perfect in all points, is worlds better than it was.
Click here to go to Part Thirteen of The Island of Misfit Clothes.
Click here to go to the next essay chronologically.
Click here to go back to the previous essay chronologically, Part Eleven of The Island of Misfit Clothes.
Click here to go back to Part One of The Island of Misfit Clothes.
Click here to go back to the beginning.
This has been a fantastic series which I've followed with interest. I've been doing a similar reconstruction over some months (in starts and fits), but not marvellously creating step-by-step photos like you've done.
ReplyDeleteThere are a lot of interesting little problems covered, which you've spent time looking at, and it probably makes a big difference to those people more accustomed to the vague, sometimes unhelpful information on alterations very often thrown out by the tailoring profession.